Project snapshot
- Authorised scope
- Individual fourth-year CMP408 IoT and Cloud project using a Raspberry Pi, supplied teaching AWS environment and a DroidCam-backed V4L2 camera source.
- My contribution
- I wrote the C kernel module and Python device service, integrated camera capture, designed the Lambda request routing, connected MQTT and S3, and implemented the browser request and image-rendering path.
- Technical focus
- Linux GPIO and interrupts
- Character devices and ioctl
- Python and V4L2 capture
- AWS IoT Core and MQTT
- Lambda and API Gateway
- S3 image storage
- Demonstrated outcome
- The prototype handled local and remote capture requests through one workflow and returned stored images to the browser. The review also identified concrete concurrency, recovery, authentication and durability work required beyond the coursework demonstration.
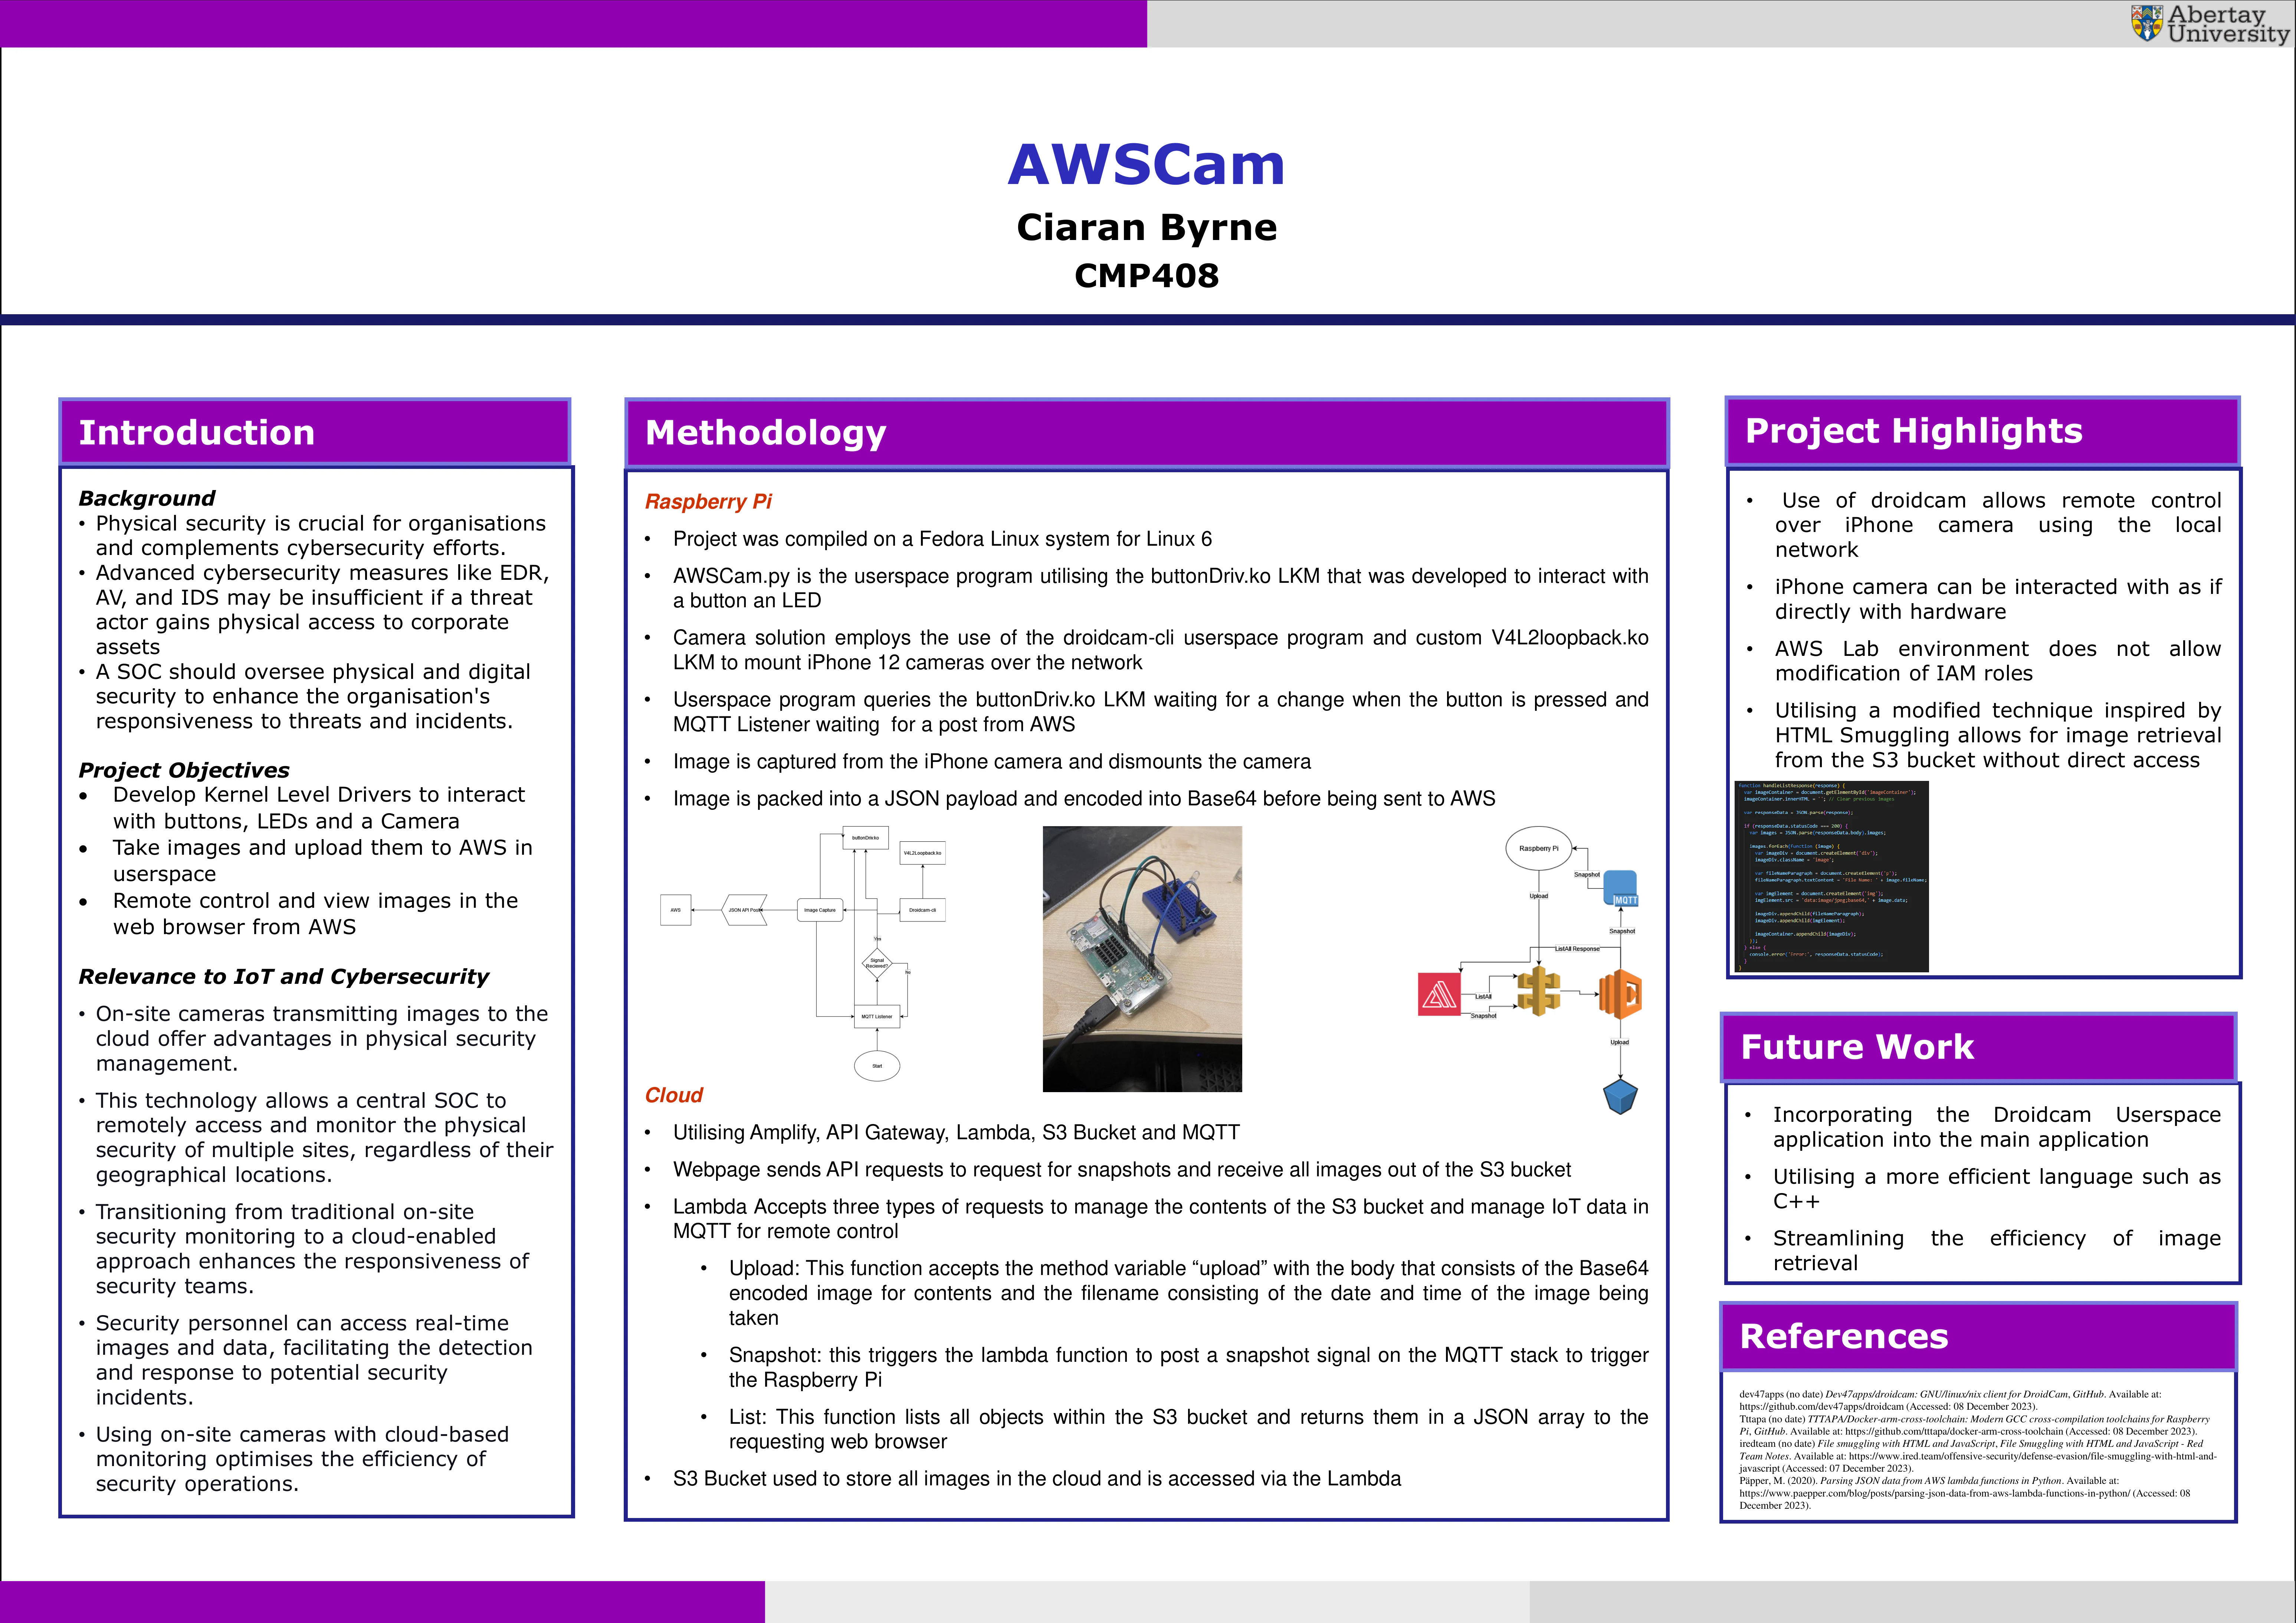
System overview
AWSCam was my fourth-year CMP408 IoT and Cloud project. I built a Raspberry Pi camera system that could respond to either a physical button press or a request from a browser, capture a photograph, upload it into AWS, and return the stored images through the same browser interface.
The project crossed the complete device-to-cloud path. I wrote a loadable Linux kernel module in C to own the GPIO button and status LED, exposed a character device for userspace, and created three ioctl operations for reading the button state and controlling the indicator. A Python service consumed that interface, started the camera transport, read a frame through OpenCV and V4L2, encoded it as JPEG, and sent it through API Gateway.
AWS IoT Core provided the remote trigger. A Lambda function handled three request types: publish a snapshot message to the Raspberry Pi, decode and store an uploaded image in S3, or retrieve the current images for the browser. The browser JavaScript then converted the returned data into visible image elements.
The physical and remote controls deliberately converged on one capture function. That avoided building two separate image paths and made the hardware button, MQTT callback, camera process, encoding, upload and LED state part of one system.
The completed prototype met the coursework objectives and demonstrated each boundary in the workflow. It was not a production surveillance platform; the implementation boundaries and required security and reliability work are assessed later in the case study.
The project is useful because it shows more than the final photograph. It shows how a hardware interrupt became a userspace state, how that state reached a camera, how the image moved through cloud services, and where reliability and security problems appeared between those layers.
Why I built it
The project had three implementation objectives:
- develop a kernel-level interface for the button and status LED
- capture and upload images from a userspace service
- support remote capture and image viewing through AWS
The completed path crossed kernel and userspace boundaries on the Raspberry Pi, then continued through MQTT, HTTPS, API Gateway, Lambda, S3, and browser-side JavaScript. I treated the physical button and remote request as two inputs to the same capture function so the image handling did not split into separate implementations.
The original use case was physical-security monitoring. Endpoint security and network detection do not remove the need to understand activity around the systems being protected. A camera that can be controlled locally and remotely provided a practical way to connect a physical event at a site with a central cloud interface.
I treated the project as a systems-integration exercise rather than only an AWS exercise. The finished implementation had to make several different interfaces agree:
| Boundary | Responsibility |
|---|---|
| Physical hardware to kernel | Register the button event and control the capture indicator |
| Kernel to userspace | Expose a small character-device contract |
| Userspace to camera | Start the transport and obtain a usable V4L2 frame |
| Device to AWS | Receive MQTT instructions and upload through HTTPS |
| API Gateway to Lambda | Route the requested operation |
| Lambda to AWS IoT Core | Publish the remote capture instruction |
| Lambda to S3 | Store and retrieve binary image objects |
| Browser to API | Request a snapshot or the current image collection |
| Browser to returned data | Parse the response and render the photographs |
End-to-end architecture
The two capture inputs entered the system through different routes but converged inside the Raspberry Pi service:
Physical capture
button press
  -> GPIO interrupt
  -> buttonDriv.ko stores the event
  -> Python reads /dev/button_device
  -> snapshot()

Remote capture
browser request
  -> API Gateway
  -> Lambda
  -> AWS IoT MQTT publish
  -> Raspberry Pi callback
  -> snapshot()

Image delivery
snapshot()
  -> DroidCam and V4L2
  -> OpenCV frame
  -> Pillow JPEG
  -> Base64 JSON request
  -> API Gateway
  -> Lambda
  -> S3

Image retrieval
browser list request
  -> API Gateway
  -> Lambda
  -> S3 enumeration
  -> Base64 response
  -> JavaScript rendering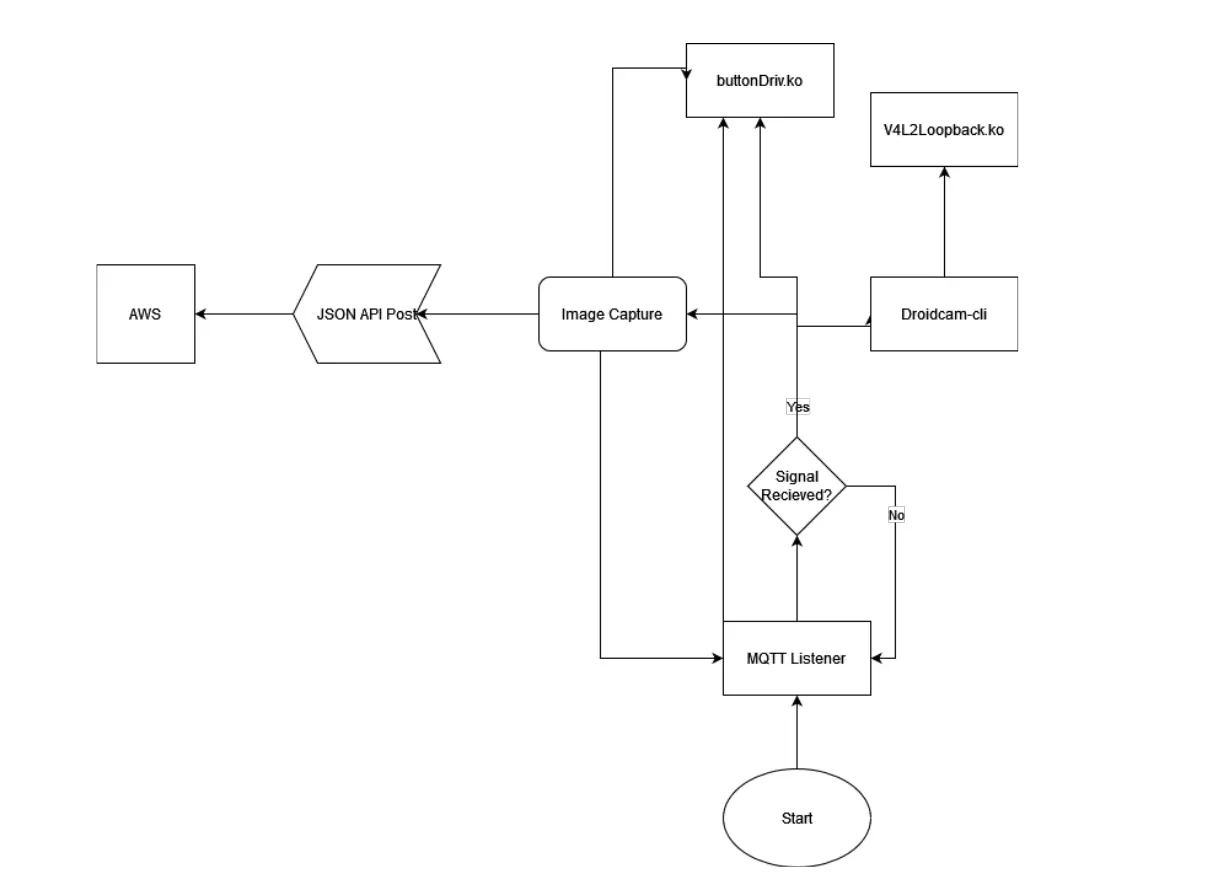
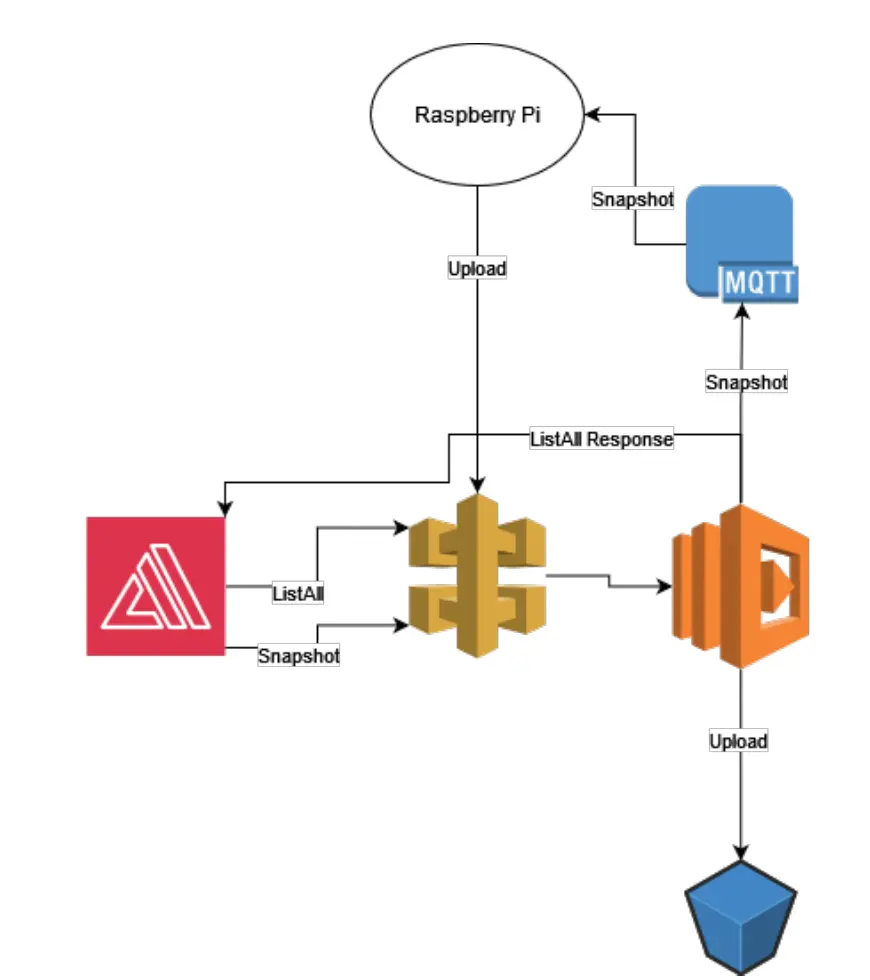
This architecture made failures easier to locate. A button problem could be tested before the camera. Camera output could be tested before AWS. MQTT publication could be checked separately from upload, and S3 storage could be checked before browser rendering.
It also meant that a successful browser request was not the same as a successful photograph. The first HTTP request only caused Lambda to publish an MQTT instruction. Capture and upload happened later in a separate path. The prototype did not yet carry one request identifier across both operations, so the browser could not prove which later object belonged to its original request.
GPIO interrupt and character device
The physical build used a Raspberry Pi, push button, LED, jumper wires, and two resistors. GPIO 16 received the button input and GPIO 23 drove the LED used as a capture indicator.
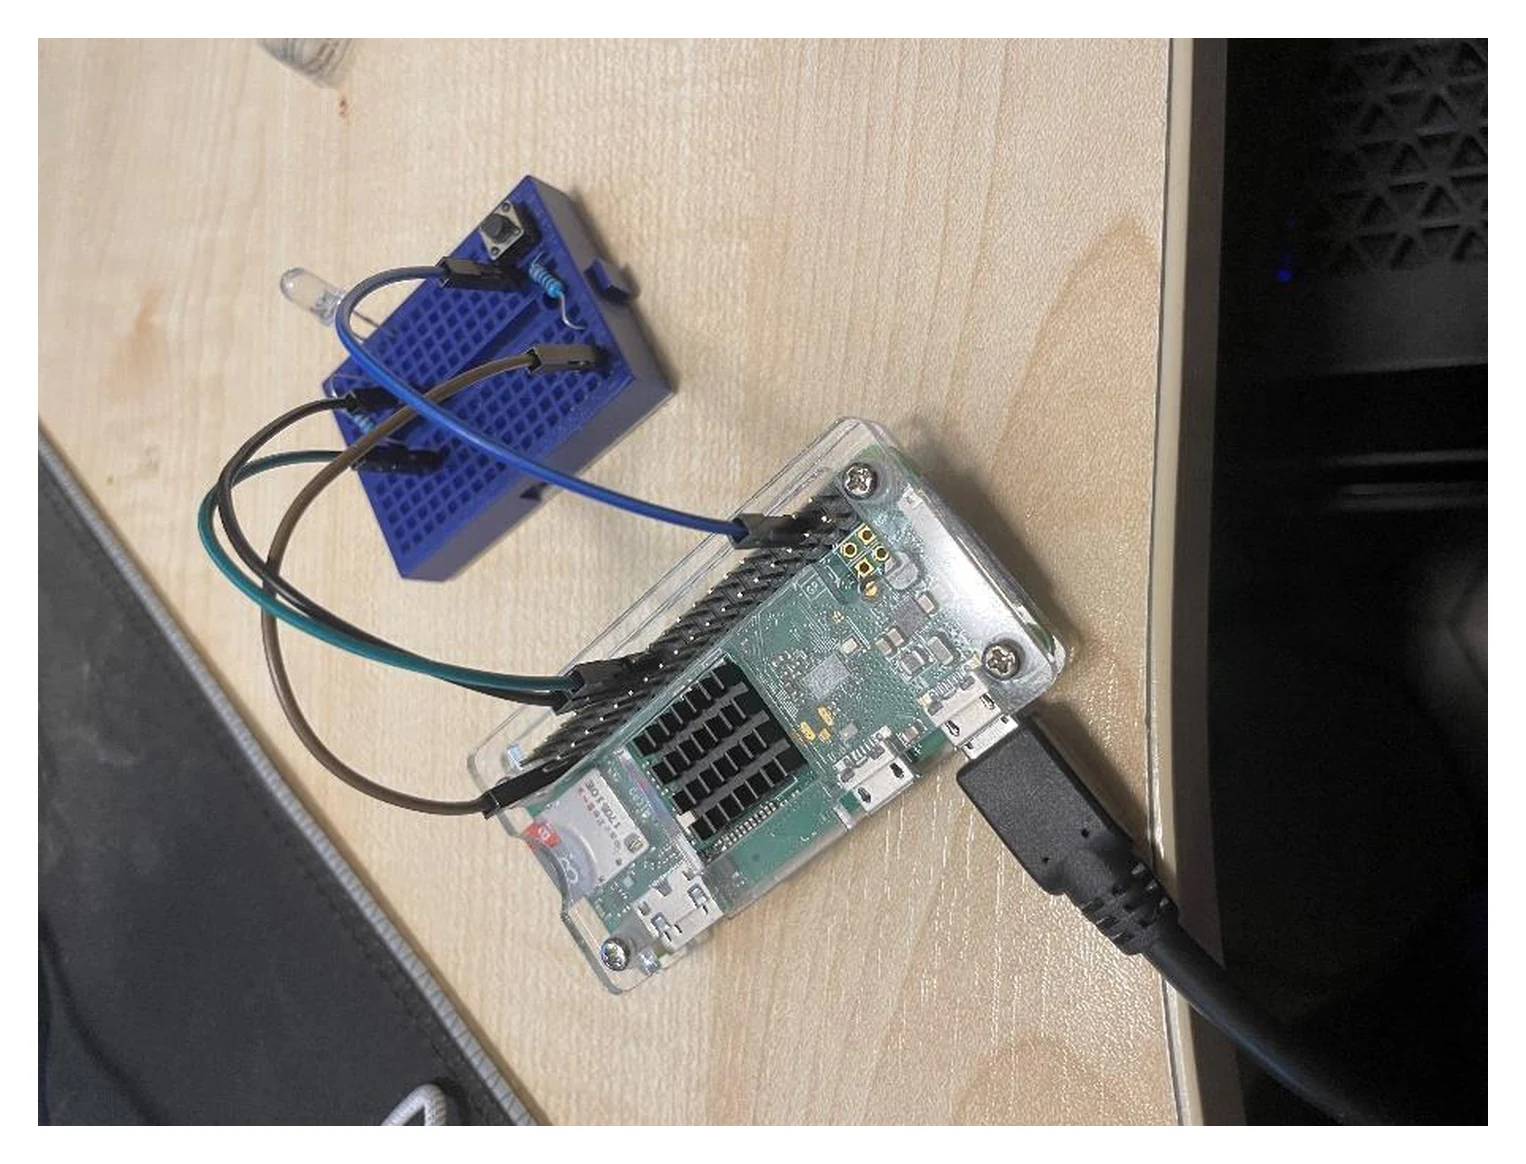
The LED represented the state of the local function rather than a complete cloud acknowledgement. If the HTTP request stalled, the indicator remained tied to the blocked operation. A deployed device would need to distinguish between an accepted event, camera activity, a locally saved image, an upload in progress and a confirmed cloud object.
I wrote buttonDriv.c as a loadable Linux kernel module. Its initialisation routine:
- checked that both GPIO identifiers were valid
- requested the LED and button pins
- configured the LED as an output and the button as an input
- applied button debounce handling
- mapped the button GPIO to an interrupt number
- registered a rising-edge interrupt handler
- created a device class and character device named
/dev/button_device
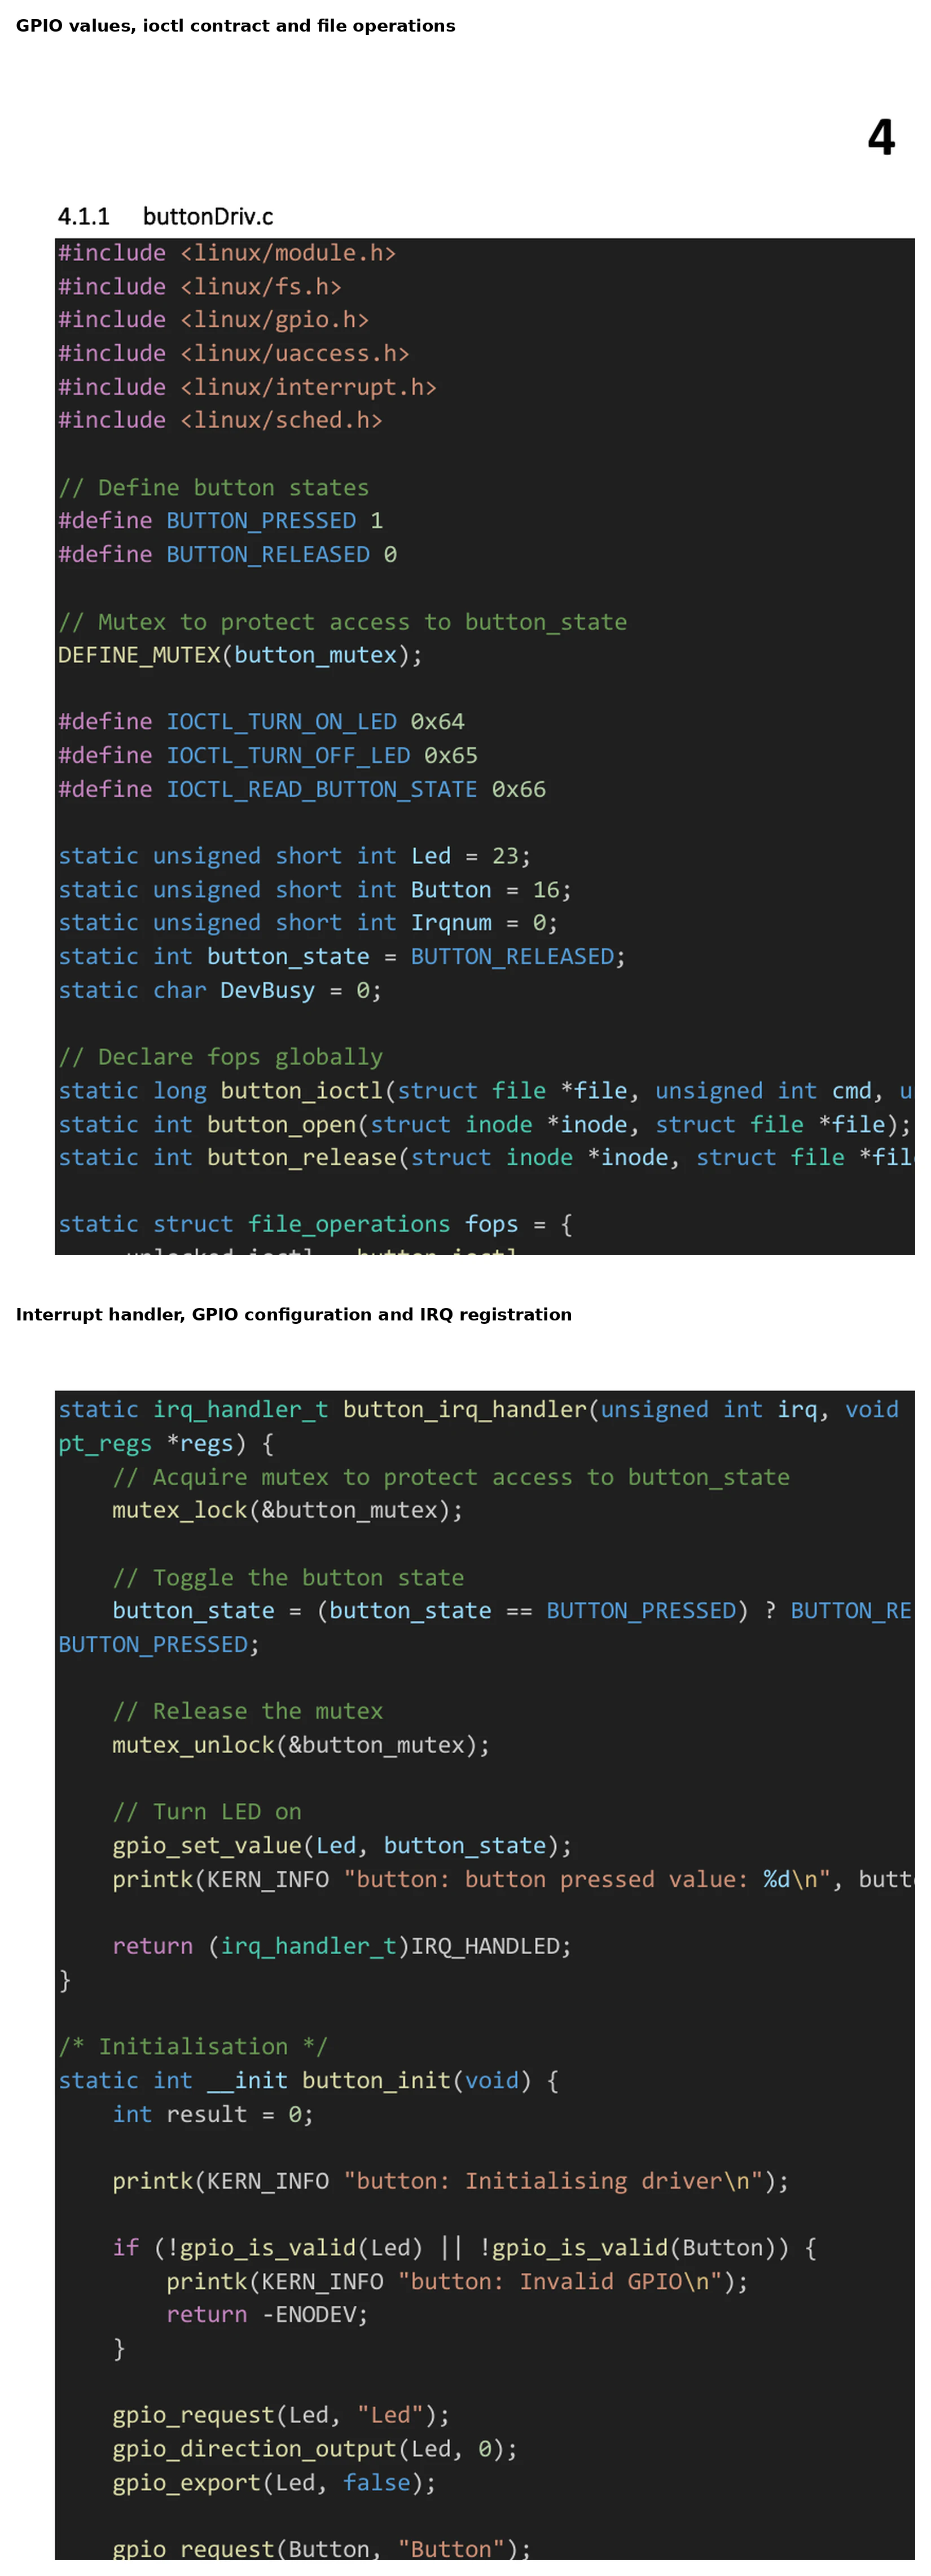
The module used a stored state rather than a queue of button events. That allowed a polling process to observe the press after the interrupt returned, but it also meant multiple edges were not represented as separate requests. The later LED-off ioctl reset the state after the capture path completed.
The interrupt handler protected the shared button state with a mutex, changed the state when a press arrived, and updated the LED. The character device used a dynamically allocated major number and a file_operations structure with open, release, and unlocked_ioctl handlers.
I exposed three ioctl operations:
- switch the LED on
- switch the LED off and reset the stored button state
- copy the current button state back to userspace
The command values were shared between the C module and Python service, giving both sides the same small protocol. IOCTL_READ_BUTTON_STATE copied a C integer through the file descriptor into a ctypes.c_int; the other two operations had no payload. The Python helper opened the device only for the duration of each call.
The open and release handlers tracked whether the device was already in use and held the kernel module while the character device was open. On unload, the module released the IRQ, unexported and freed both GPIO pins, destroyed the device and class, and unregistered the character device.
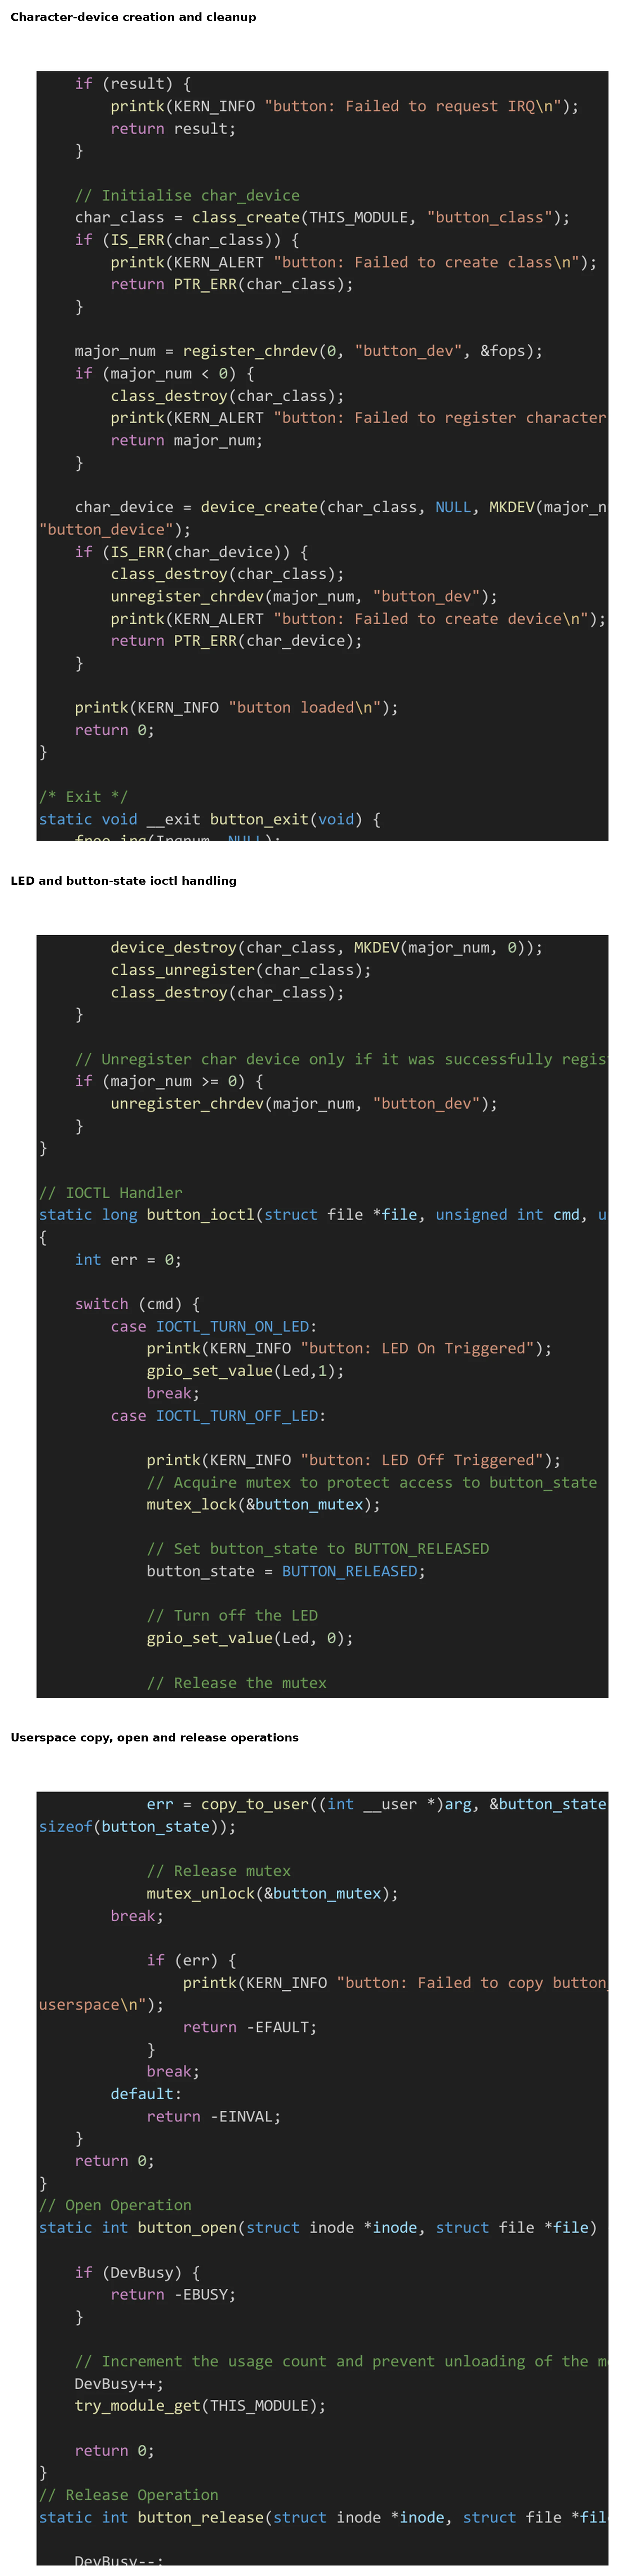
/dev/button_device, processed the LED and state operations, copied the state into userspace and released the allocated kernel resources.The interface was small enough to understand as a protocol. Userspace did not need to know the GPIO numbers or interrupt configuration. It only knew that three commands existed and that one of them returned an integer state.
This kept GPIO ownership in the driver while giving the Python service a compact userspace interface. Python could poll one integer state and control the indicator without writing directly to the GPIO filesystem.
The source review also identified several driver changes I would make before treating the interface as robust:
- the interrupt handler takes a mutex, but a hard-interrupt path must not use a sleeping lock; an atomic state, spinlock, or deferred work item would be appropriate
- the handler toggles state on every rising edge, so electrical bounce or repeated edges can invert the intended meaning even with the requested debounce interval
DevBusyis an unprotected byte, leaving the single-open check vulnerable to concurrent opens- the
copy_to_user()error test sits after an unconditionalbreakand is therefore unreachable - initialisation failures after GPIO or IRQ allocation do not unwind every resource acquired earlier
gpio_set_debounce()depends on controller support and its result is not checked
These are not theoretical style points. They sit on the boundary between an asynchronous hardware event and a userspace consumer, where missed cleanup or unsafe locking can affect the whole kernel rather than only one process.
A stronger module would use a staged initialisation path with one cleanup label for each acquired resource. It would expose an event-oriented interface through read(), poll() or a wait queue rather than requiring one-second polling. The interrupt path would perform the minimum atomic state change and wake a safer deferred or userspace operation.
I would also test the interface under repeated button edges, simultaneous opens, failed userspace copies, module removal during access and partial initialisation failures. The 2022 prototype demonstrated the hardware-to-userspace route; these tests would establish that the interface remained correct under pressure and failure.
Userspace device interface
The Python application shared the same three command values as the C module. Each helper opened /dev/button_device, issued one operation and closed the descriptor again.
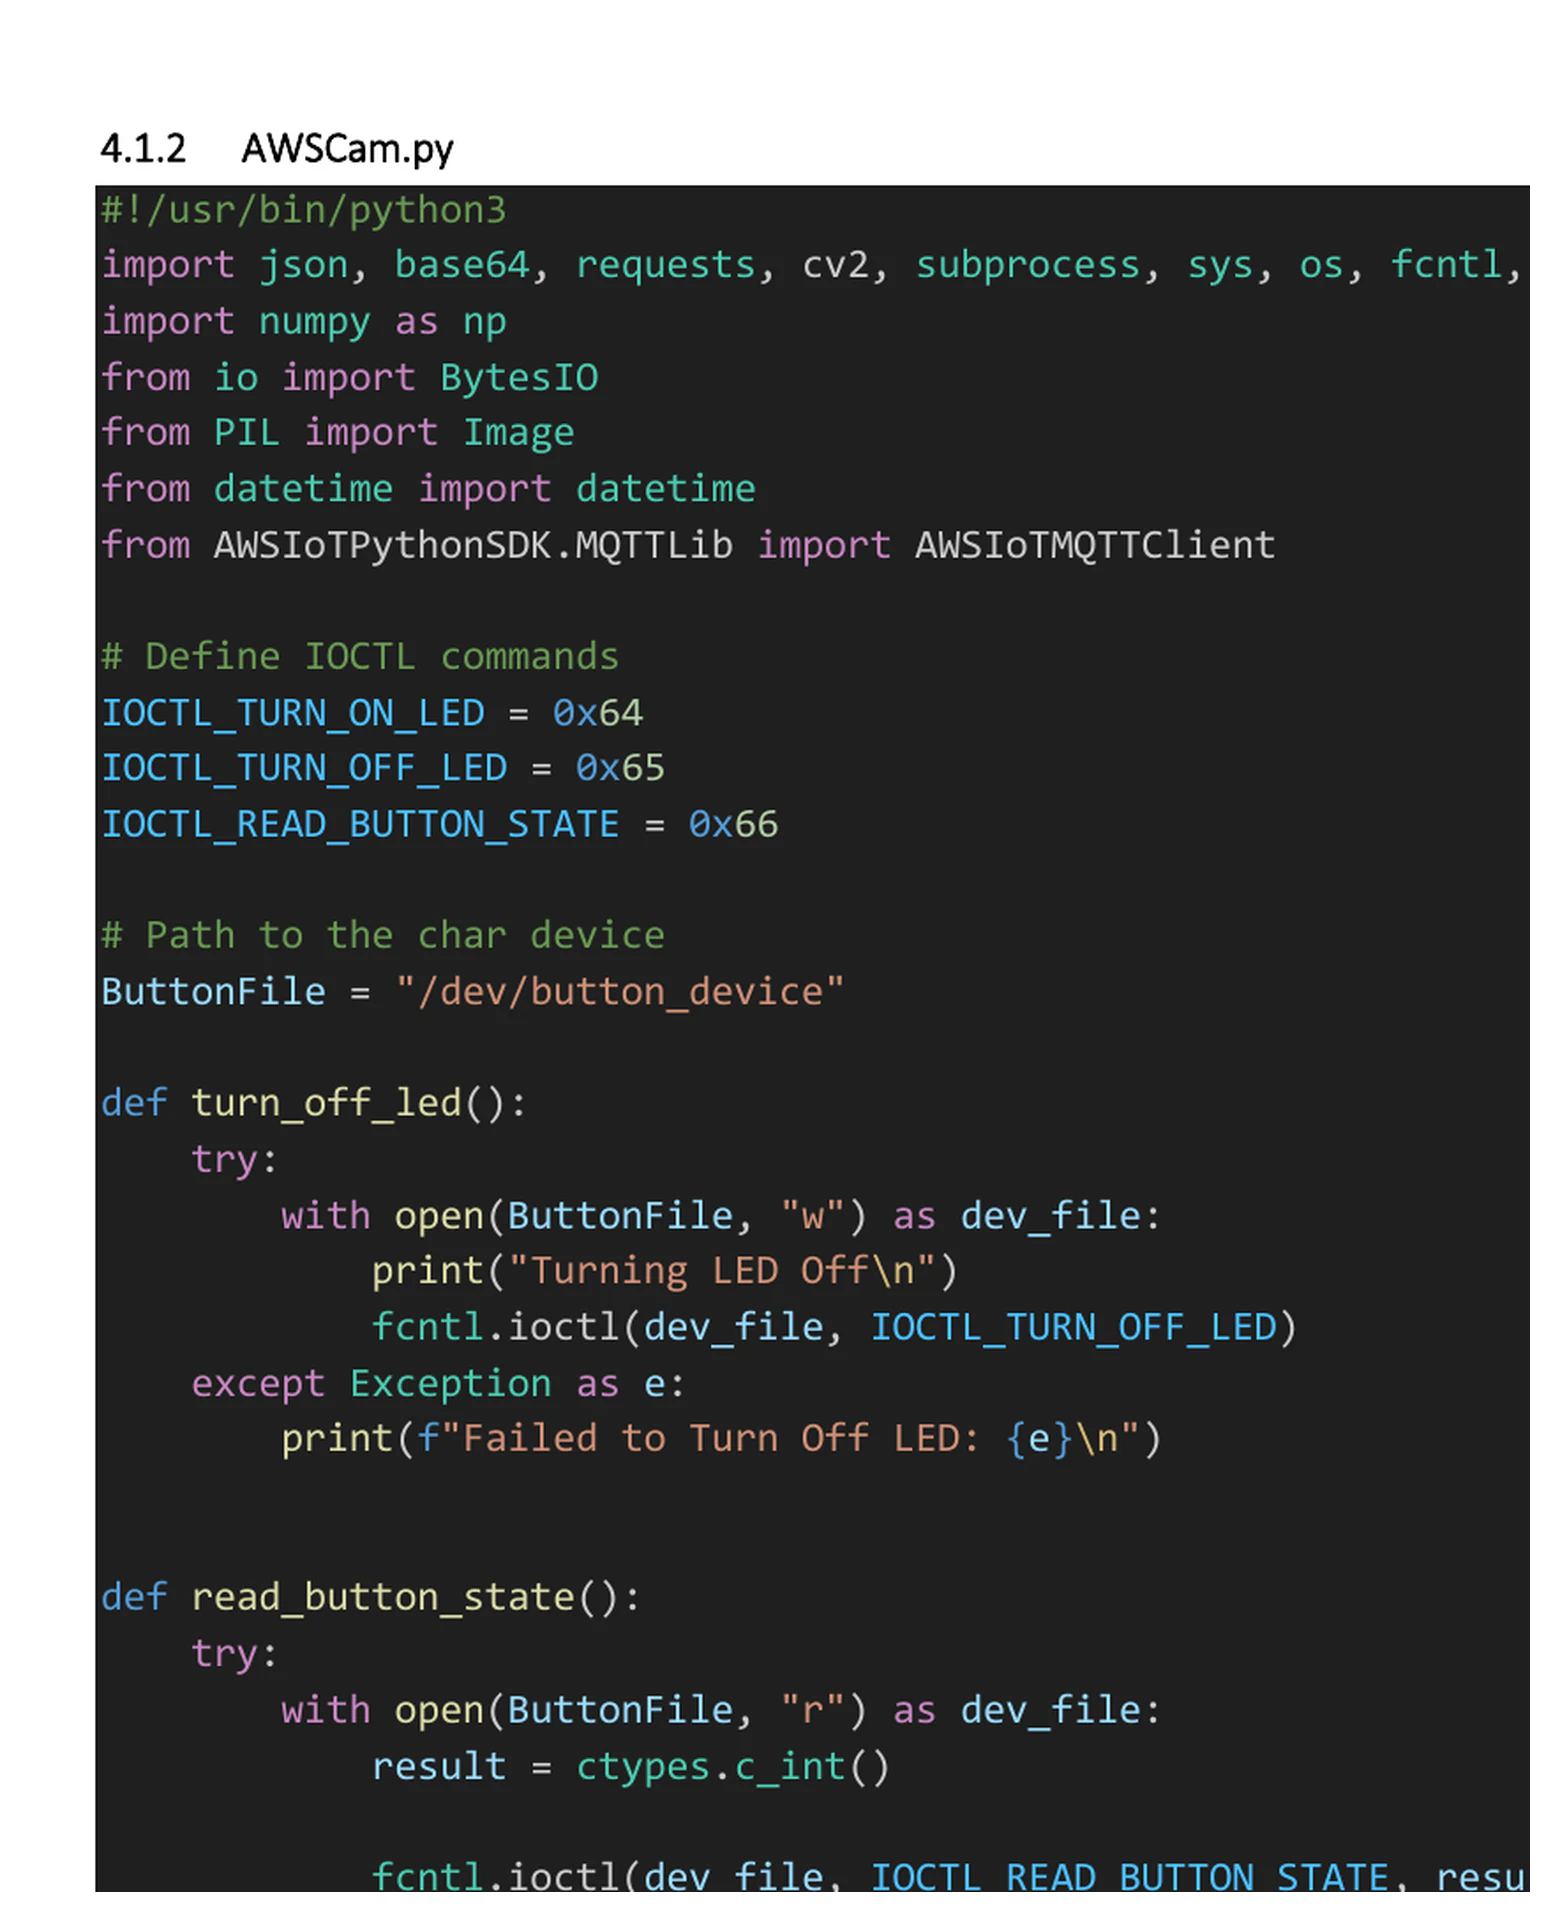
This separation kept the rest of the service independent of the exact kernel call. The control loop could call read_button_state(), turn_on_led() and turn_off_led() without duplicating the character-device buffer handling.
The main limitation was polling. The process opened the device and checked the same integer once per second even when no physical event had occurred. Blocking event delivery would reduce repeated syscalls, lower latency and make the device state easier to model.
Camera integration through V4L2
The intended Raspberry Pi camera module was incompatible with the available board and software configuration. I used an iPhone 12 camera through DroidCam and an adjusted V4L2 loopback module instead. DroidCam was a third-party dependency; my own service started it, consumed its video device, and connected the result to the rest of the project.
AWSCam.py launched the DroidCam command-line client as a subprocess with the camera connection values supplied to the Python programme. OpenCV then opened video device 0, read one frame, and released the device. I converted the frame from OpenCV’s BGR representation to RGB, created a Pillow image, and wrote the JPEG into an in-memory BytesIO buffer. The service terminated the DroidCam subprocess after capture rather than keeping the network camera active between requests.
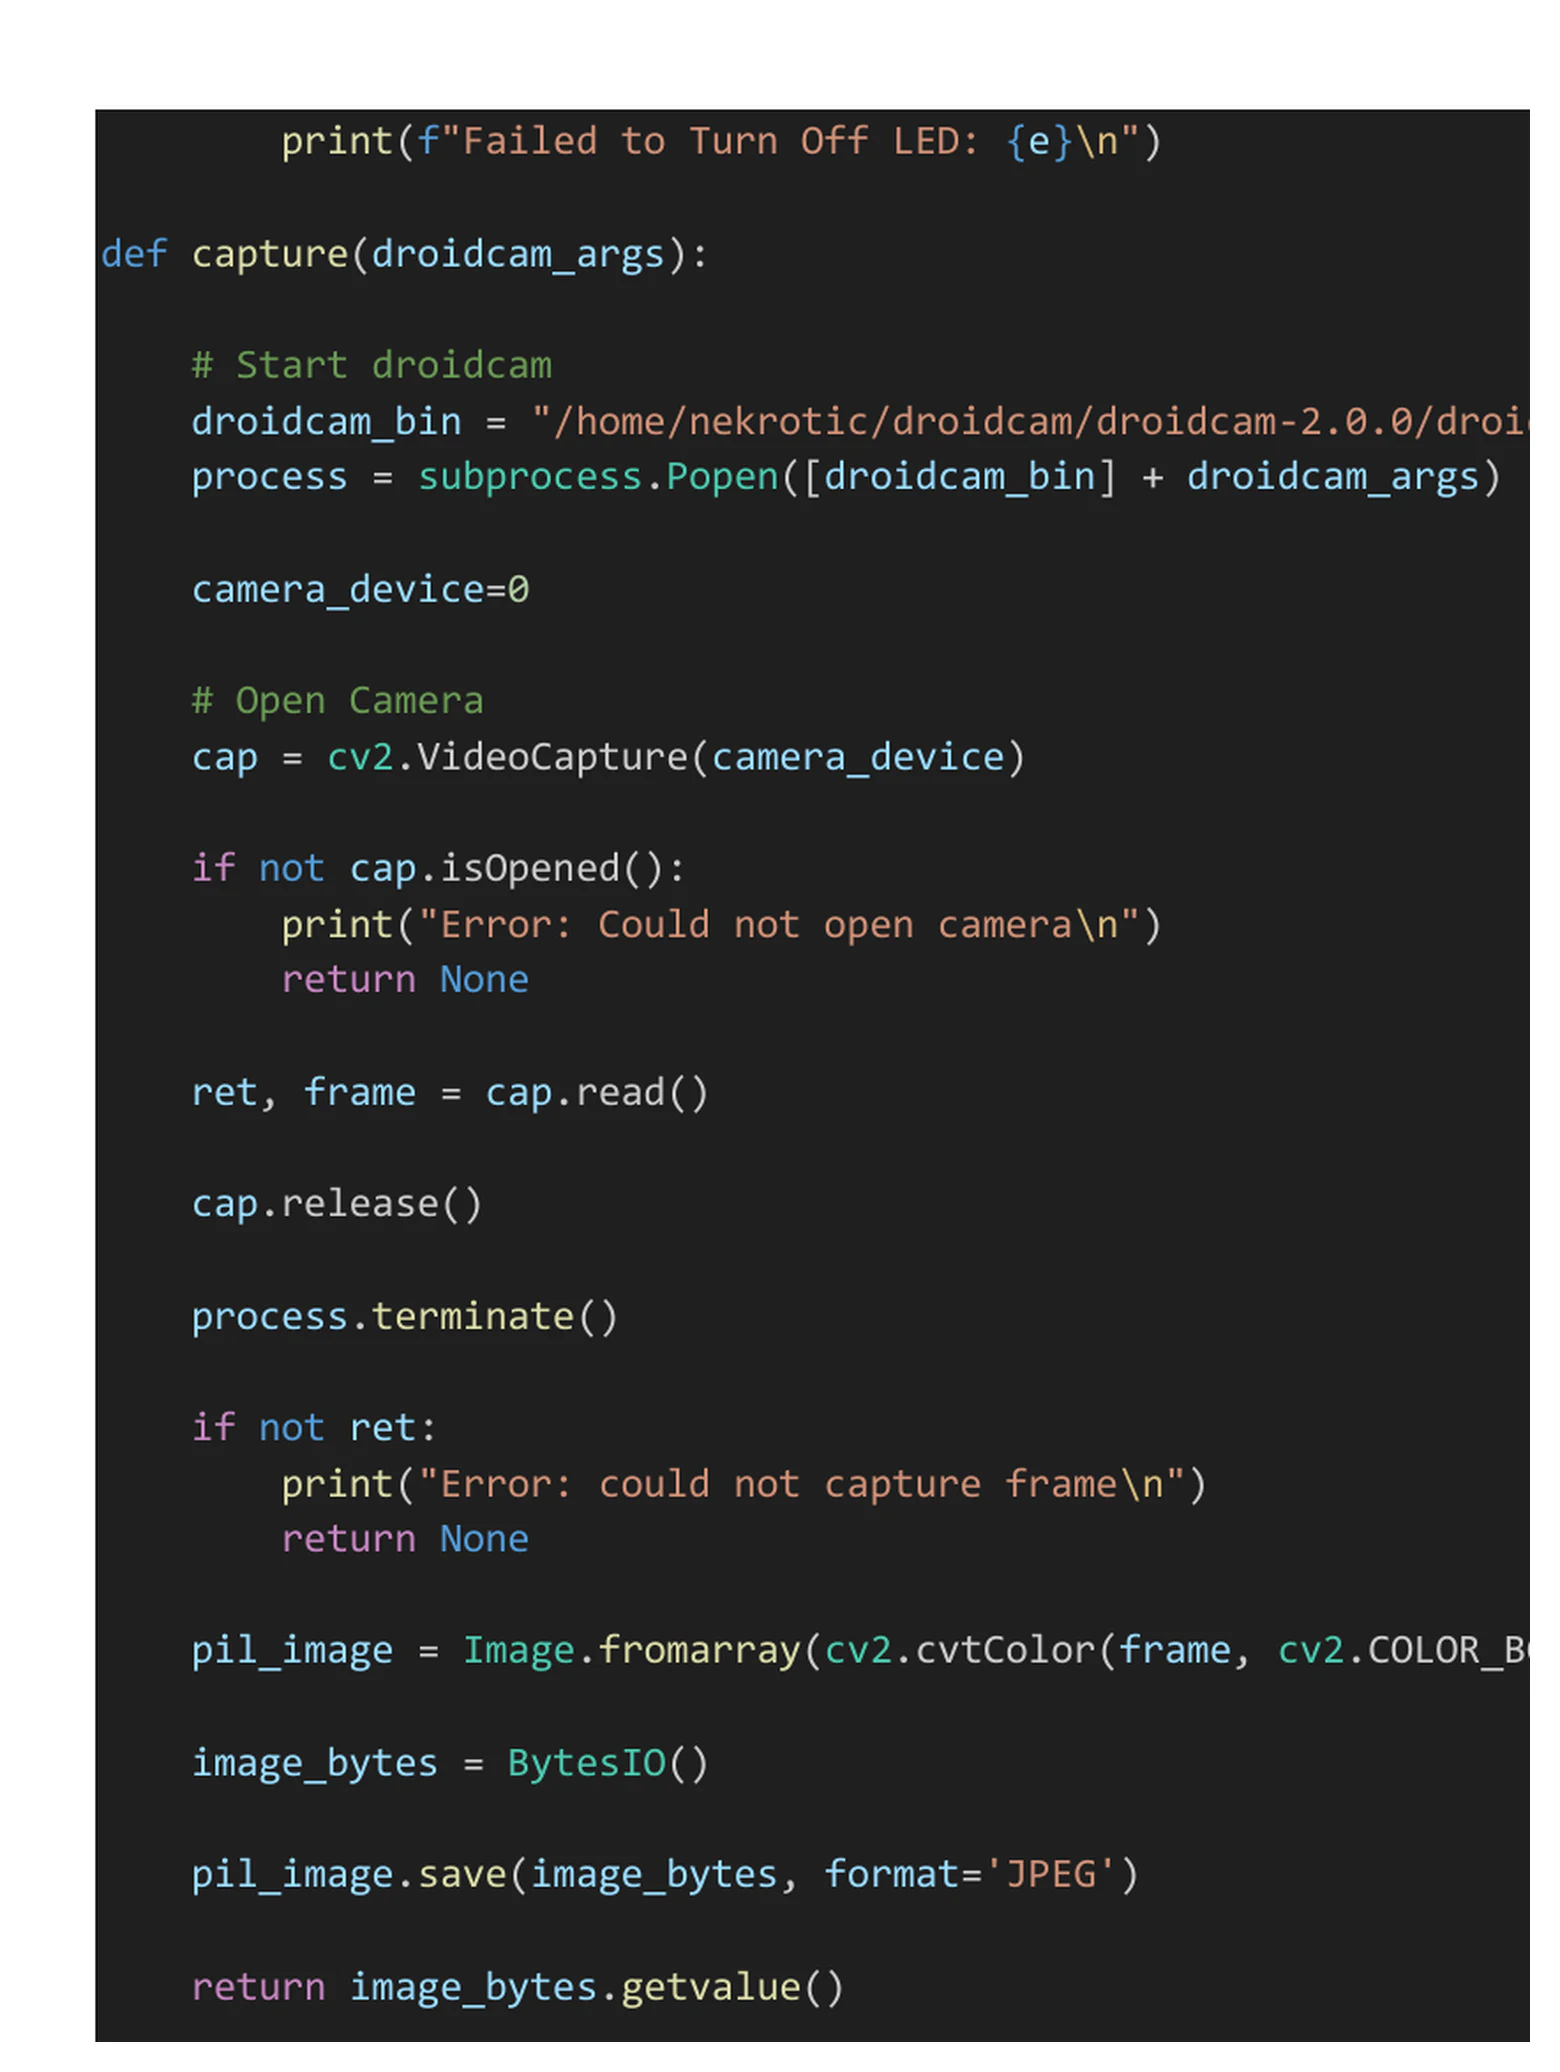
Using V4L2 kept the capture code independent of the phone-specific transport. Once DroidCam exposed the stream as a standard Linux video device, OpenCV could process it in the same way as another local camera source.
The implementation started DroidCam and attempted to open the video device immediately. It did not wait for device readiness. If VideoCapture failed to open, the function returned without terminating the subprocess; exceptions could leave the camera process running for the same reason. A stronger capture wrapper would use try/finally, wait for the V4L2 device with a timeout, verify the selected device rather than assuming index 0, and terminate or kill the child process predictably.
Only one frame was read. That was enough for the demonstration, but the first available frame after starting a network camera may be stale, incomplete, or poorly exposed. A production capture path could discard initial frames, apply a resolution and quality policy, record capture metadata, and validate the encoded output before uploading it.
The finished image existed only in memory. If the network failed after capture, there was no local artefact queued for a later retry.
Python control loop
The userspace service opened /dev/button_device and used fcntl.ioctl to read the state and control the LED. It also created an AWS IoT MQTT client, connected with the device certificate material from the lab, and subscribed to the AWSCam topic at QoS 0.
The main loop checked the button state once per second. A true state called snapshot(), while the MQTT callback called the same function when it received a snapshot message. The function then:
- switched on the status LED
- started the camera process
- captured and encoded one JPEG frame
- generated a filename from the date and time
- wrapped the Base64 image, filename, and
uploadmethod in JSON - posted the request to API Gateway over HTTPS
- switched off the LED and reset the stored button state
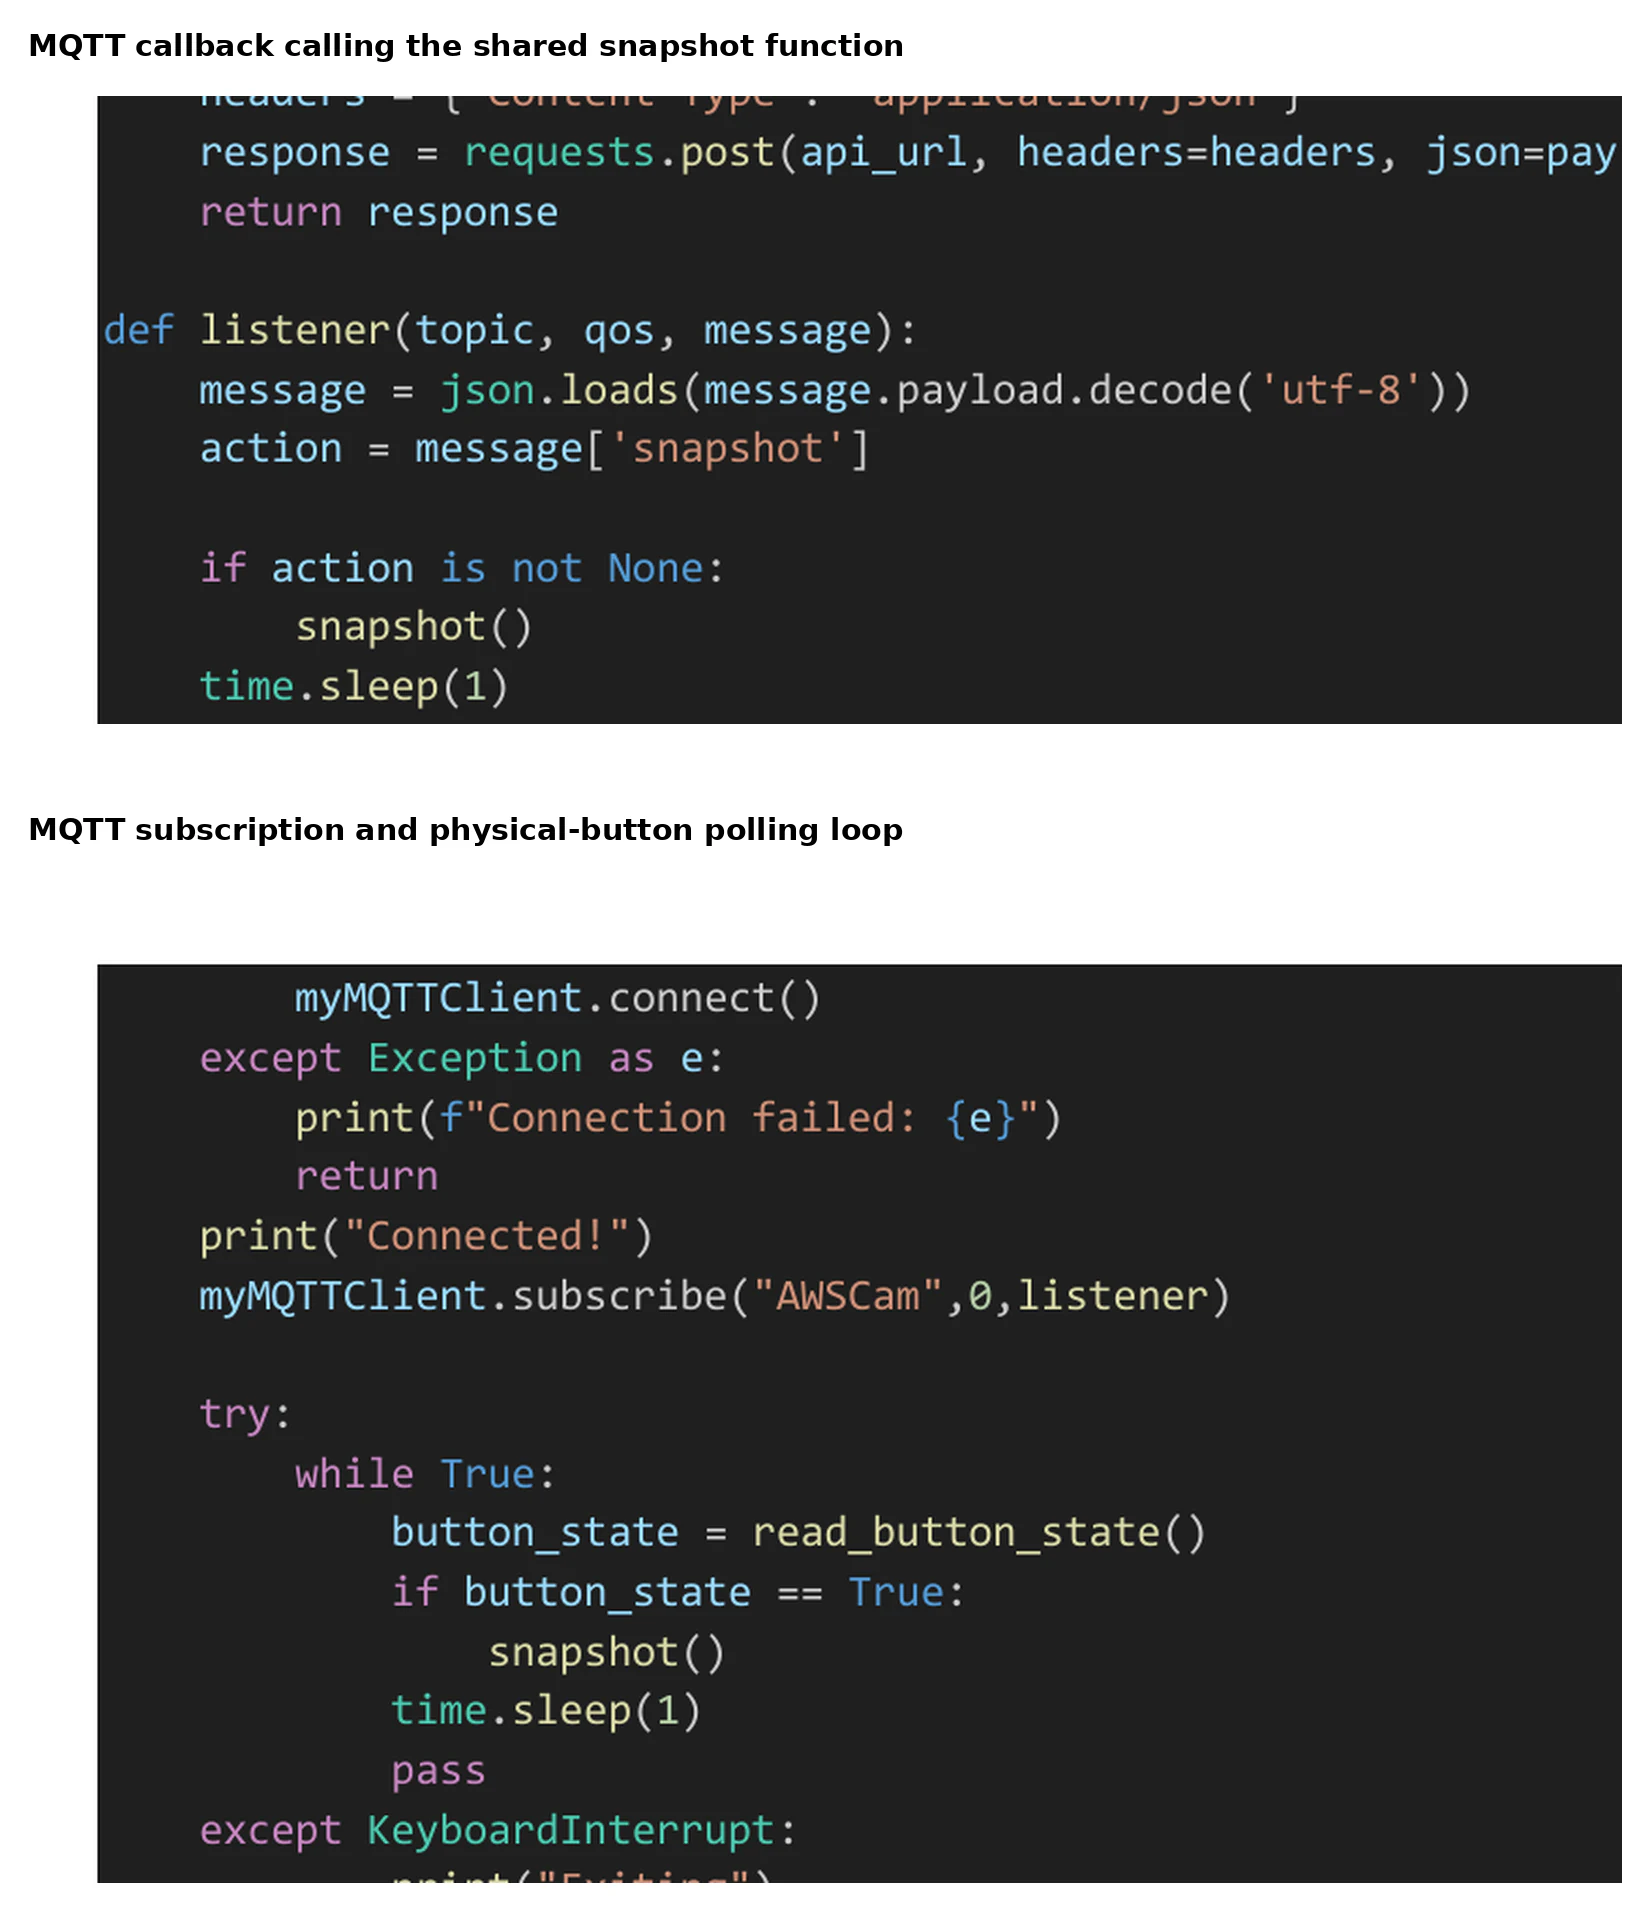
The shared function simplified the implementation, but it also made concurrency explicit. The callback and main loop could enter it from different contexts. The camera, LED and button state therefore needed one owner even though two components could request work.
The local and remote paths could invoke snapshot() from different execution contexts. The source did not serialise capture operations, so two near-simultaneous requests could start competing camera processes, use the same device, and change the LED or button state underneath each other. A capture queue or lock would make one component responsible for state transitions and allow additional requests to be rejected, coalesced, or processed later.
The HTTP request also had no explicit connection or read timeout and no retry or idempotency identifier. If the upload stalled, the status LED and button state remained tied to the blocking request.
AWS service design
The cloud side used AWS Amplify for the browser, API Gateway for the HTTPS entry point, Lambda for request routing, AWS IoT Core for the device instruction and S3 for the image objects.
| Service | Role in the prototype |
|---|---|
| AWS Amplify | Hosted the browser interface |
| API Gateway | Accepted browser and Raspberry Pi POST requests |
| Lambda | Routed snapshot, upload and list operations |
| AWS IoT Core | Published the remote capture instruction to the device topic |
| Amazon S3 | Stored the decoded JPEG objects |
| Browser JavaScript | Issued requests and rendered the returned images |
The AWS teaching environment restricted changes to IAM. That constraint affected the image-retrieval design. I could not implement the direct object-access model I initially considered, so Lambda read and returned the image content on behalf of the browser.
Three AWS request paths
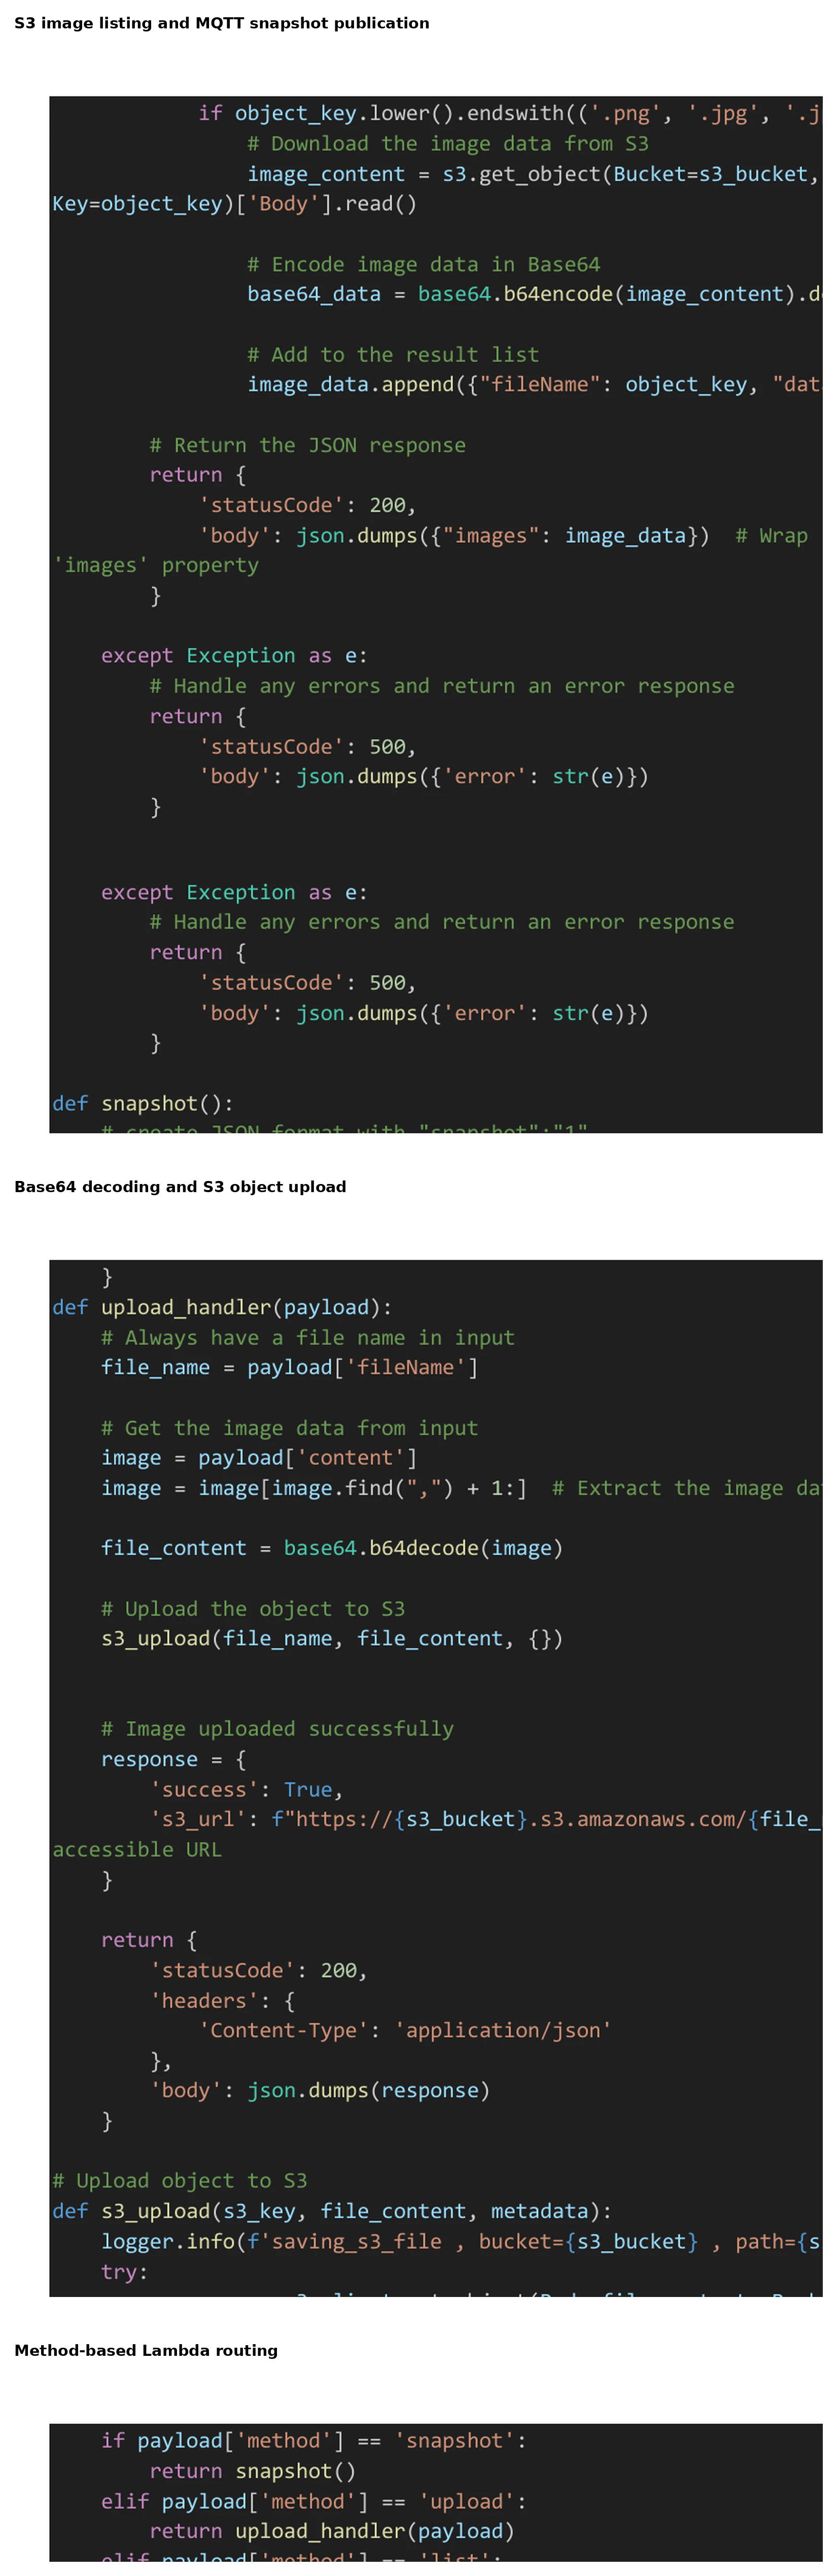
API Gateway passed browser and device requests to one Python Lambda function. The handler parsed the request body and routed it by a method field.
Remote snapshot
The browser’s Snapshot button sent a snapshot request. Lambda published a JSON message to the AWSCam AWS IoT topic, which triggered the callback in the Raspberry Pi service. The image returned through a separate upload request rather than through the MQTT response.
This was an asynchronous request even though the browser used an ordinary HTTP call. A successful API response meant that the MQTT message had been published; it did not mean the camera had captured or uploaded a photograph. The interface had no correlation identifier to connect the browser request with the later S3 object and no device acknowledgement to show whether the Pi was online.
The response semantics were therefore weaker than the interface implied:
| Browser-visible event | What it actually proved |
|---|---|
| Snapshot request returned HTTP 200 | Lambda published a message |
| MQTT callback executed | The Raspberry Pi received the instruction |
| Upload returned HTTP 200 | Lambda accepted and stored the object |
| Image appeared in list | The browser could retrieve the stored object |
A production interface should not collapse those states into one success message.
Image upload
The Raspberry Pi sent an upload request containing the timestamped filename and Base64 image. Lambda decoded the content and used the S3 client to create an object in the project bucket. S3 therefore held the photograph as binary image data rather than retaining the transport encoding.
The timestamp used the Raspberry Pi’s local clock to the nearest second. Two captures within one second could therefore select the same key and overwrite an object. The Lambda trusted the supplied filename and image content, did not enforce an extension or decoded-size limit, and did not attach a verified content type. A generated object identifier plus separate capture metadata would avoid using a client-controlled key as the record identity.
The Lambda also needed request validation before decoding. A deployed endpoint should limit the encoded and decoded size, verify the content format, generate the S3 key server-side, attach the correct content type, reject unknown fields and record the device identity that created the object.
The timestamp could remain useful metadata, but it should not be the unique database identity for the capture.
Image listing
The browser’s List button sent a list request. Lambda enumerated the objects in S3, selected recognised image extensions, read each object, converted it to Base64, and returned an array of filename-and-data objects.
The JavaScript cleared the current image container, parsed the response, created an element for each result, set a Base64 data URL as the image source, and appended the filename and image to the page.
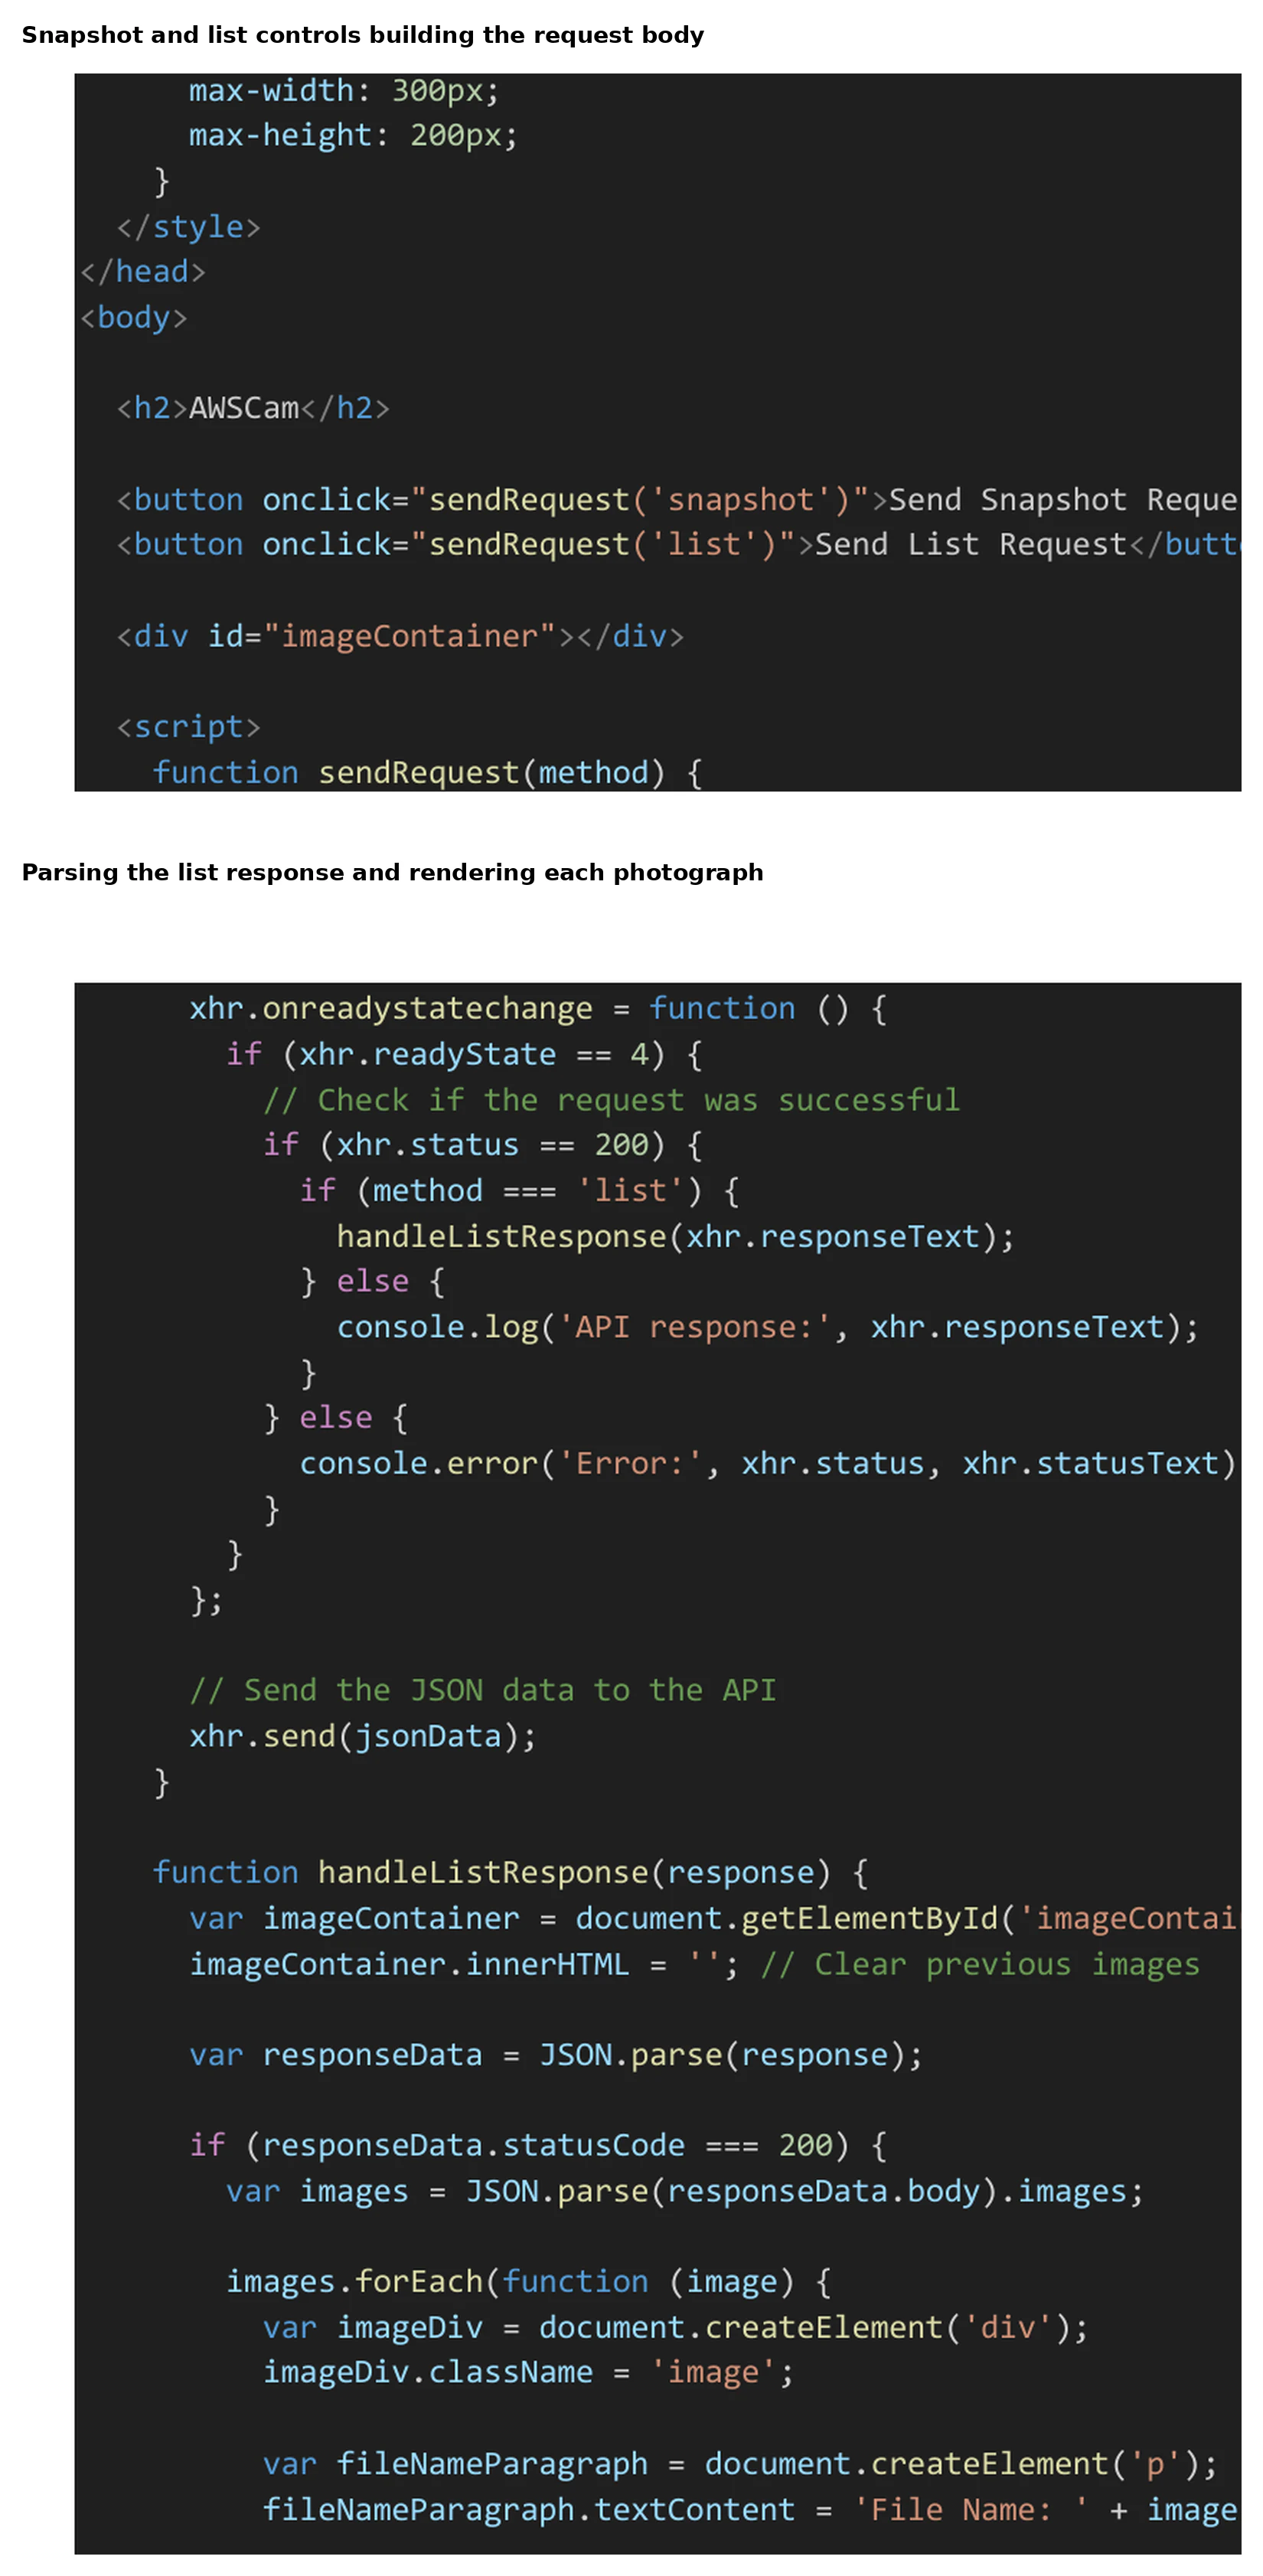
The Lambda used one list_objects_v2 response and did not follow continuation tokens, so it would stop at the service’s page limit. It then downloaded every matching object synchronously and placed every encoded image into one API response. The browser declared every returned image as JPEG even though the Lambda also admitted PNG and GIF keys.
This worked for a handful of coursework images. As the bucket grew, execution time, Lambda memory, S3 reads, Base64 expansion, API response limits, browser memory, and page-rendering time would all grow together.
Returning image data through Lambda let the browser work within the available IAM permissions, but it coupled retrieval cost and response size to the number and size of stored images.
Validation and demonstrated behaviour
The four-minute demonstration shows the assembled device, button and LED activity, the browser displaying captured images, and responses in the AWS console. During testing, the driver registered button events and controlled the LED, the userspace service captured from the V4L2 device, and both local and MQTT requests invoked the image path. The AWS components accepted uploads, stored the JPEG objects, and returned them to the browser.
I tested each boundary separately:
- kernel log output confirmed driver loading, IRQ mapping, button events, and
ioctlcalls - the LED showed capture state at the device
- OpenCV and Pillow produced a JPEG byte stream from the V4L2 source
- the MQTT subscription received the Lambda-published snapshot message
- the API upload returned a successful response
- the object appeared in S3 under its timestamped name
- the browser list request rendered the stored object
That sequence was more informative than a final screenshot because it identified where to start when one stage failed.
I grouped the validation by boundary:
| Boundary tested | Observed result |
|---|---|
| Kernel initialisation | Driver load, GPIO validation, IRQ mapping and device creation output |
| Physical input | Button presses changed the stored state and LED |
| Kernel/userspace interface | Python ioctl calls returned and reset the expected value |
| Camera transport | DroidCam exposed a V4L2 stream accepted by OpenCV |
| Image processing | Pillow produced a JPEG byte stream in memory |
| Remote device control | Lambda publication reached the MQTT subscriber |
| Device upload | API Gateway accepted the encoded request |
| Cloud storage | Lambda created the named S3 object |
| Browser retrieval | The list path returned and rendered the stored image |
The tests established the end-to-end route but were not a soak test. I did not measure long-term camera availability, reconnect behaviour, upload throughput, Lambda cost, concurrent capture load or retention across a large image collection.
The workaround camera performed better than I expected, but it introduced another process and a network dependency into every capture. Error handling was also local to each stage. A camera failure returned no frame, an upload failure printed the HTTP response, and an MQTT connection failure stopped the service initialisation. The implementation did not yet have a queue, retry policy, offline buffer, or central device-health state.
Limitations and next engineering iteration
The prototype demonstrated the intended hardware-to-cloud workflow, but its boundaries were those of a coursework system. It used a restricted teaching AWS environment, a workaround network camera, a compact driver interface, synchronous capture and upload, and a small image collection. The browser also had no user identity, role separation or image-lifecycle controls.
The most important changes are connected rather than isolated:
- Website and API: the browser could request captures and retrieve images without user authentication or separate permissions. The next version should add identity-backed sign-in, enforce capture and viewing permissions at the API, validate and rate-limit requests, restrict CORS, and apply an appropriate Content Security Policy and security headers.
- Device identity: the Raspberry Pi used static certificate files from the teaching environment. Each device should receive its own identity and least-privilege IoT policy, with controlled provisioning, rotation and revocation.
- Capture and delivery: one synchronous function owned the camera, LED, image and HTTP upload, with no durable retry queue. Each request should receive an identifier, the completed image should be saved locally, and separate capture and upload workers should own their respective operations.
- Kernel/userspace boundary: the service polled a single stored state and the driver needed stronger interrupt locking, open-state protection and failure cleanup. Event delivery through
read(),poll()or a wait queue would reduce polling, while focused tests should cover concurrency and partial initialisation failures. - Storage and retrieval: Lambda returned every image as Base64 in one unpaginated response. A stronger design would keep S3 private, return paginated metadata, issue short-lived URLs for authorised objects, and separate thumbnails from full-resolution images.
- Operations: testing proved each boundary but did not cover soak behaviour, concurrent capture load or reconnect recovery. Device health, request state, structured logs and metrics would support targeted camera, network and AWS failure testing.
A stronger remote workflow would preserve one identity across the asynchronous operation:
authorised browser creates a capture request and request ID
  -> API stores the pending state and publishes to one device
  -> device acknowledges, captures and saves the image locally
  -> upload worker delivers the image with the same request ID
  -> cloud marks the request complete
  -> authorised browser receives a short-lived image URL
This distinguishes “message published” from “photograph stored”, supports retries without taking another photograph, and creates an audit trail across the website, API, device and object. I originally proposed replacing Python with C++ for efficiency, but ownership and recovery matter more than language choice: one component should own the camera, another should own delivery, and every request should have a durable state.
Engineering outcomes and lessons
AWSCam joined a custom Linux kernel interface, Python orchestration, physical input, V4L2 image capture, MQTT control, an HTTPS API, serverless routing, object storage and a browser into one demonstrated workflow. Building it required me to design and debug the boundaries between C and Python, kernel and userspace, a network camera and OpenCV, the Raspberry Pi and AWS, and Lambda responses and browser-side rendering.
The website completed the remote-control and retrieval experience, but it demonstrated functionality rather than a finished security boundary. A deployed version should authenticate its users, authorise capture and viewing separately, enforce those decisions in the API rather than trusting browser code, validate and rate-limit requests, restrict cross-origin access, apply browser security headers, keep S3 objects private, and record who requested or viewed each photograph.
The main lesson was that the image itself was the easy part. The difficult work sat between the components: preserving a hardware event until userspace observed it, making one camera safe for two request sources, deciding what an HTTP success actually meant, retaining a photograph when the network failed, and retrieving private objects without turning every page load into a complete bucket download.
Those are the same boundaries that affect larger IoT systems. Hardware events, device identity, network state, cloud permissions and stored data each need clear ownership and a failure model. The project produced a working end-to-end system, exposed the limitations of its first implementation, and established a concrete direction for a more secure and resilient iteration.