Lab-series snapshot
- Coursework scope
- Individual FOR-240 laboratory work using a controlled physical SSD, a self-created VHD image, a supplied BitLocker image, a personal test drive and two course RAID members whose provenance was not recorded.
- Work completed
- I created and checked E01 images, examined a supplied BitLocker volume through a read-only decrypted view, tested Sleuth Kit workflows, and assembled a two-member RAID0 set from course images whose provenance was not recorded.
- Forensic focus
- Acquisition and integrity
- Encrypted-volume access
- Parser failure handling
- Read-only RAID reconstruction
- Results
- One FTK image passed its recorded MD5 and SHA-1 verification, the BitLocker volume was examined read-only, the lab-created E01 parsing failure remained unresolved, and the recorded RAID0 geometry produced an active read-only array.
One evidence chain across four labs
I completed four individual FOR-240 exercises in 2021. They were short teaching exercises rather than one investigation, but together they formed a useful progression: preserve a source, verify the representation being examined, expose only the layer needed for access, and stop when a tool cannot support a stronger conclusion.
I completed the acquisition and examination work. The teaching environment supplied the BitLocker image and its unlock material. For the Sleuth Kit exercise, I created raw and E01 images from a 100 MB NTFS virtual disk. For the RAID exercise I began with two supplied member images and a defined geometry; I did not derive the geometry or establish who created those inputs. Those boundaries matter because acquisition, examination and reconstruction are different contributions.
Results at a glance
| Exercise | Result and limit |
|---|---|
| Physical SSD acquisition | Result: FTK stored and computed MD5/SHA-1 values matched; no bad blocks were reported. Limit: this verifies the FTK image only; I did not record an equivalent EnCase source-data comparison. |
| BitLocker examination | Result: partition offset 65,536; Dislocker view mounted read-only after two syntax errors. Limit: supports relationships within the lab scenario, not real-world authorship, intent or attribution. |
| Sleuth Kit test | Result: EWF verification passed; partition parsing failed; a separate drive image tested the remaining workflow. Limit: the substitute demonstrates tool use, not recovery or validation of the failed lab-created image. |
| Linux RAID reconstruction | Result: two loop devices formed an active, read-only RAID0 array using the recorded 64 KiB chunk size. Limit: member provenance and geometry derivation were not documented; the layout was not independently inferred. |
Acquisition: verify data, not container identity
I connected a 120 GB SATA SSD to the forensic workstation through a hardware write blocker, then created E01 images with FTK Imager and EnCase. I recorded the device details, physical condition, connection method, imaging tools and destination format.
FTK verification showed matching computed and recorded values for both MD5 and SHA-1, with no bad blocks reported in the image.
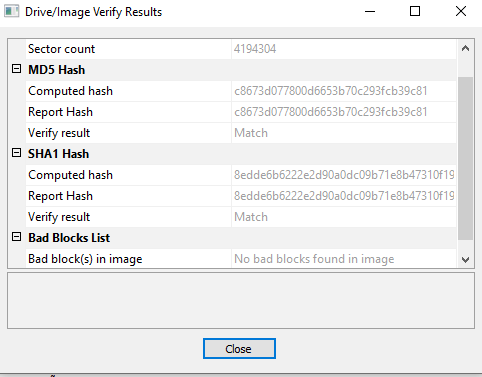
The later HashCalc comparison produced different hashes for the two complete E01 files. That is not the same comparison as checking acquisition digests over the captured source data: an E01 container also includes tool-written metadata and segmentation information. At the time I attributed the difference to the tools and acquisition times, but I did not record equivalent source-data verification output from EnCase. I therefore treat the FTK match as confirmed and the cross-tool equality of the captured data as unverified.
The disciplined sequence demonstrated by the exercise was:
- identify and record the physical device;
- prevent avoidable writes to the source;
- acquire into a forensic container;
- retain the tool’s acquisition and verification record;
- compare the stored and recalculated acquisition digests; and
- examine a verified working representation rather than the source device.
BitLocker as a separate evidence layer
The next exercise supplied a 250 MiB NTFS image that another investigator had acquired, with SHA-1 B8B98F66624D234AB284. I used Ubuntu 20.04, Dislocker and ExifTool to access and document the contents.
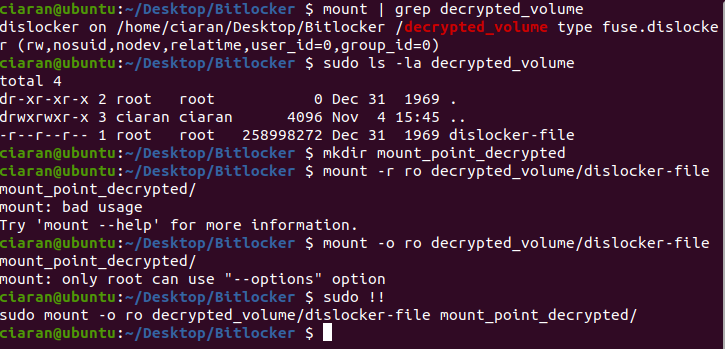
fdisk showed one 247 MiB partition beginning at sector 128. With 512-byte sectors, the encrypted partition began at byte offset 65,536. I used that offset and the supplied lab unlock material with Dislocker in read-only mode. Dislocker exposed a dislocker-file, which I then mounted separately with the Linux ro option.
Two mount commands failed before the corrected mount -o ro form succeeded. Keeping those errors in the account makes the troubleshooting sequence clear without pretending the first syntax was valid.
The mounted filesystem contained the standard system directories and an IoT Devices directory with three documents and four images. I recorded file metadata with ExifTool and calculated MD5 and SHA-1 values for the examined files. Several timestamps fell on 13 September 2018, while the names and content linked the files to the supplied IoT investigation scenario.
Those observations support relationships within the exercise dataset. They do not establish who created the files, whether their timestamps reflect deliberate user activity, or whether the scenario described a real planned attack. The safe conclusion is narrower: the read-only workflow exposed the supplied volume, and its file content, metadata and hashes could then be documented together.
A parser failure is still a result
I imaged a 100 MB NTFS virtual disk in raw and E01 formats before testing Libewf and The Sleuth Kit. The resulting E01 passed its EWF integrity check, then returned cannot determine partition table when the workflow reached partition parsing.
I did not force an offset or claim to have recovered the failed image. I passed a physical test drive into the virtual machine, created a separate image and used that controlled substitute to exercise the remaining partition, filesystem and file-listing commands.
That substitution answered a tooling question: the workflow could operate against another image presented through the same environment. It did not identify why the original failed. I did not isolate image layout, format support, partition metadata or device presentation as the cause, so none is presented as the confirmed explanation.
RAID0 reconstructed from recorded geometry
The final exercise began with two raw member images. I attached them as read-only loop devices with partition scanning enabled, then used the supplied RAID0 level, two-device count and 64 KiB chunk size with mdadm --build. The exercise did not identify who created the member images or how the parameters had been derived.
/proc/mdstat reported /dev/md0 as an active, read-only RAID0 array across the two members. fdisk then exposed a 50 MiB logical device with two partitions. The first was mounted using ro, noatime, noload, nodev and nosuid; the second used ro and noatime.
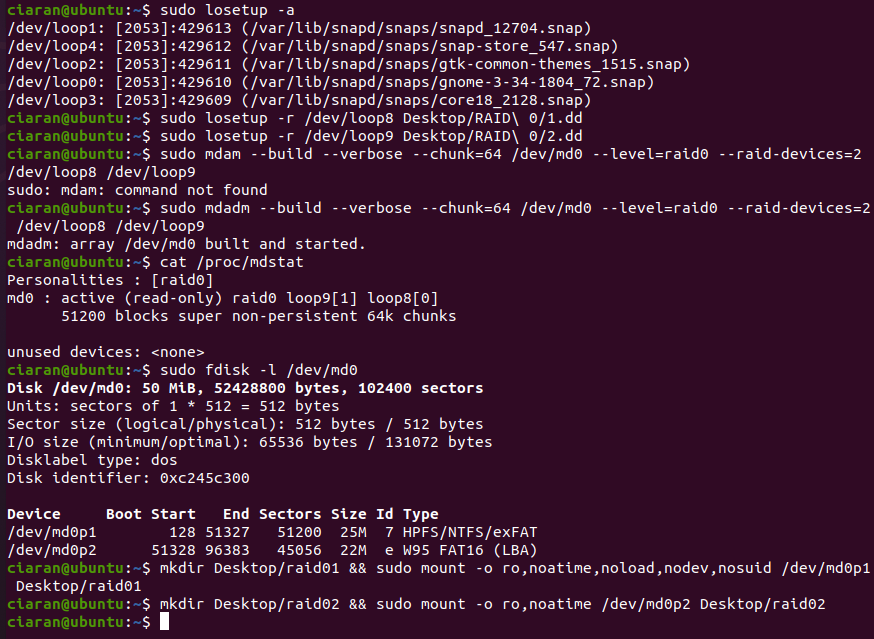
mdadm built the recorded two-member RAID0 geometry; /proc/mdstat reported the array active and read-only before its partitions were mounted with the documented restrictions.The mount flags reduced avoidable changes and execution risk on the analysis host. They did not replace source hashes or a write blocker. The distinction between the two partition commands also matters: I did not use the complete restriction set for both mounts, so I do not imply that I did.
Because mdadm --build was given the level, member count and chunk size, this was reconstruction from recorded parameters rather than independent recovery of an unknown RAID layout. The validated result was that those parameters produced an addressable read-only array and mountable partitions.
What the series demonstrates
The useful outcome is the decision-making chain across unlike storage problems:
- the physical acquisition produced a verifiable E01 record;
- the encrypted image was exposed as a separate decrypted view before mounting;
- a parser failure was preserved and isolated with a substitute test image;
- the RAID members were assembled read-only from explicitly recorded geometry; and
- content conclusions were kept narrower than the access and metadata evidence allowed.
These were brief coursework exercises, not complete case files. I did not produce a full chain-of-custody history, validate every tool, record equivalent acquisition digests from both imaging applications, complete a root-cause analysis of the failed E01 parse, or independently derive the RAID parameters.
This remains a historical 2021 learning artefact. Ubuntu 20.04, the tool versions, MD5 and SHA-1 choices and exact mount workflow describe that teaching environment rather than a current operational baseline. In a modern repeat, I would retain complete acquisition logs, record SHA-256 alongside any format-required legacy digest, validate the tools against known test media and document every transformation from source device to examination view.