
CentOS lab setup
This lab added a CentOS machine to the Active Directory network I had built previously. The goal was to use it as a DHCP server, configure remote administration with SSH, and practise Linux users, groups, ownership, and file permissions.
CentOS was a Red Hat Enterprise Linux-compatible distribution and stood for Community ENTerprise Linux Operating System. At the time of this lab, it was a useful way to practise server administration on a Linux distribution with familiar enterprise-style tooling, including yum, systemd, firewalld, and the traditional network-scripts layout.
The lab focused on two network services:
- Dynamic Host Configuration Protocol (DHCP)
- Secure Shell (SSH)
The CentOS virtual machine was built in VMware with:
- 1 CPU core with 2 threads
- 1 GB RAM
- 20 GB disk
- the same LAN network as the Active Directory lab,
VMnet19
I did not cover the operating-system installation itself. The configuration started after CentOS was installed.
Static network configuration
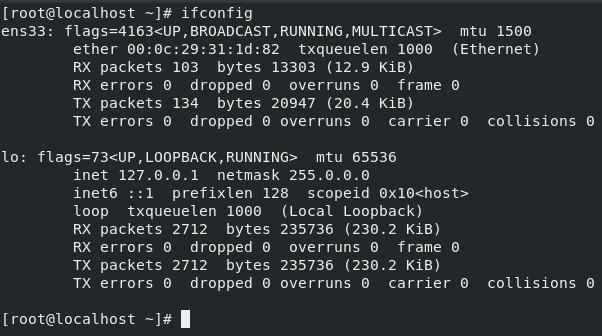
After installation, the ens33 interface did not have an IP address, so I configured it manually before setting up DHCP.
On this CentOS version, interface configuration was stored under:
/etc/sysconfig/network-scripts/ifcfg-<interface>For this VM, the interface file was:
/etc/sysconfig/network-scripts/ifcfg-ens33
The lab used the following network settings:
BOOTPROTO=none
ONBOOT=yes
IPADDR=192.168.1.4
PREFIX=24
GATEWAY=192.168.1.1
DNS1=192.168.1.2
DOMAIN=nekrotic.local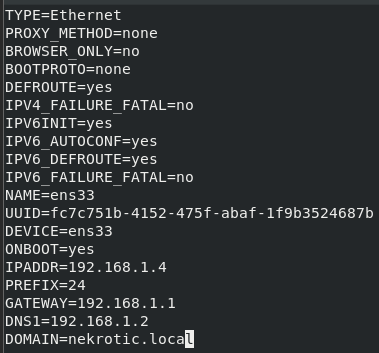
BOOTPROTO=none changed the interface away from automatic DHCP configuration. ONBOOT=yes brought the interface up when the system started. The static address 192.168.1.4 placed the server on the lab LAN, with the pfSense firewall at 192.168.1.1 and the Active Directory DNS server at 192.168.1.2.
I then changed the hostname:
hostnamectl set-hostname dhcp01-nekroticAfter rebooting so the network settings and hostname took effect, I updated the system:
sudo yum updateDHCP leases, ranges, gateway, and DNS
In the previous Active Directory lab, the domain controller and workstation used manually configured IP addresses. DHCP removes that manual work by assigning network settings to clients automatically.
DHCP can provide:
- an IP address
- a subnet mask
- a default gateway
- DNS servers
- lease timing
The basic DHCP exchange is Discover, Offer, Request, and Acknowledge, often shortened to DORA.
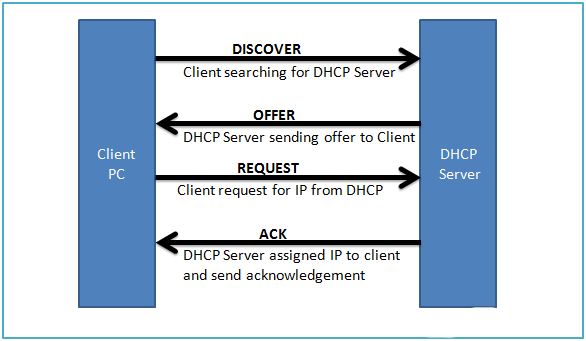
A client broadcasts a discovery message because it does not yet have an address or know which DHCP server to contact. A server replies with an offer containing an available address and other network settings. The client requests that offer, and the server acknowledges the lease.
The address alone is not enough. A client also needs the correct subnet mask, default gateway, and DNS server. In this network, the gateway provided access beyond the local subnet, while 192.168.1.2 resolved the nekrotic.local Active Directory domain.
Configuring DHCP
With remote administration prepared, I installed the DHCP service. The package name depends on the CentOS version.
For CentOS 6 or 7:
yum -y install dhcpFor CentOS 8:
dnf -y install dhcp-serverThe DHCP server configuration file was:
/etc/dhcp/dhcpd.confThe lab configuration defined the 192.168.1.0/24 subnet, the default gateway, the domain, the DNS server, the assignable address range, and lease timings:
subnet 192.168.1.0 netmask 255.255.255.0 {
    option routers 192.168.1.1;
    option subnet-mask 255.255.255.0;
    option domain-name "nekrotic.local";
    option domain-name-servers 192.168.1.2;
    range 192.168.1.10 192.168.1.254;
    default-lease-time 3600;
    max-lease-time 14400;
}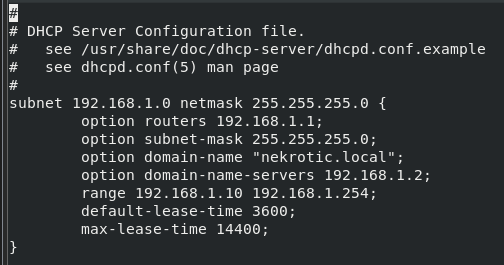
The configuration values break down as:
option routers: the default gateway clients should use.option subnet-mask: the subnet mask for the client network.option domain-name: the domain name for the lab.option domain-name-servers: the DNS server handed to clients.range: the pool of IP addresses the DHCP server can lease.default-lease-time: the default lease duration in seconds.max-lease-time: the maximum lease duration in seconds.
After writing the configuration, I enabled and started the DHCP service:
systemctl enable dhcpd
systemctl start dhcpd
CentOS also needed a firewall rule for DHCP:
firewall-cmd --add-service=dhcp --permanent
firewall-cmd --reload
The --permanent flag kept the rule after reboot, and firewall-cmd --reload applied the updated firewall configuration.
Enabling SSH access
SSH was used for remote command-line administration. Unlike Telnet, SSH encrypts the session. The transport establishes shared session keys and then uses symmetric encryption for the connection, while server and user authentication establish which systems and accounts are involved.
I used SSH to practise service installation, firewall rules, root-login hardening, and public-key authentication.
I installed the OpenSSH server and client packages:
sudo yum -y install openssh-server openssh-clientsThen I enabled and started the daemon:
sudo systemctl enable sshd
sudo systemctl start sshd
The service status could be checked with:
sudo systemctl status sshdCentOS used firewalld, so SSH also needed to be allowed through the host firewall:
sudo firewall-cmd --list-all
sudo firewall-cmd --add-service=ssh --permanent
sudo firewall-cmd --reload
At this point SSH was reachable, but the configuration still needed hardening.
SSH hardening
The first SSH change was disabling root login. In /etc/ssh/sshd_config, I changed PermitRootLogin to no:
PermitRootLogin no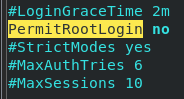
The next step was key-based authentication. SSH keys use a public/private key pair: the private key stays with the administrator, and the public key is placed on the server for the account that should be allowed to log in.
I generated a key pair:
ssh-keygenOn Linux, the public key can be copied to the server with:
ssh-copy-id nekrotic@192.168.1.4From Windows, I used the current password-based SSH access to append the public key to the target user’s authorized_keys file:
cat .\.ssh\id_rsa.pub | ssh nekrotic@192.168.1.4 "cat >> /home/nekrotic/.ssh/authorized_keys"After the key was in place, I changed the relevant SSH settings in /etc/ssh/sshd_config:
RSAAuthentication yes
PubkeyAuthentication yes
ChallengeResponseAuthentication no
PasswordAuthentication no
UsePAM no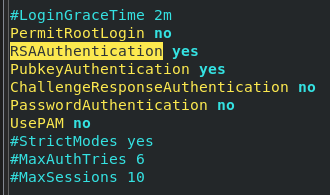
Then I restarted the SSH daemon:
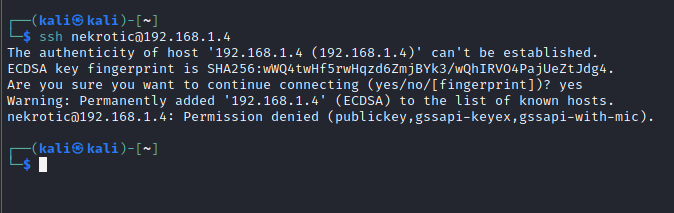
systemctl restart sshdWith that configuration, SSH access required the private key:

A connection attempt without the matching key was denied:
User accounts and file permissions
The final part of the lab moved from CentOS services into Linux users, groups, ownership, and file permissions. This was not CentOS-specific; the same concepts apply across Linux distributions.
Creating a new user required elevated privileges:
sudo useradd bobThat created the user without setting a password. To set one:
sudo passwd bobGroups were created and assigned separately:
groupadd standard-users
usermod -aG standard-users bob
The -aG flags append the user to the named group, in this case standard-users.
Linux permissions and octal notation
The command ls -l shows files, directories, owners, groups, sizes, timestamps, and permissions:
ls -l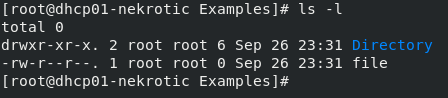
The left-hand permission string is split into sections:
- the first character shows the file type, such as
dfor a directory or-for a normal file; - the next three characters are the owner permissions;
- the next three are the group permissions;
- the final three are the permissions for everyone else.
For example, rwx means read, write, and execute. On a directory, execute means the user can traverse into it.
Ownership can be changed with chown:
chown bob fileThe group owner can be changed with chgrp:
chgrp standard-users fileOctal notation represents permissions as numbers:
xexecute = 1wwrite = 2rread = 4
Those values are added together for owner, group, and other permissions. For example, read and write without execute is 4 + 2 = 6.
For example:
chmod 762 fileThat means:
7for the owner: read, write, and execute;6for the group: read and write;2for others: write.
The 762 mode is useful for reading the notation, although granting write access to everyone else would be inappropriate for many real files.
The remaining ls -l columns identify the link count, owner, group, size, last modification time, and file or directory name. Together with the mode string, they show both who owns an object and what the owner, group, and other users can do with it.
Incorrect file permissions can create real risk. Overly permissive files can expose data or allow unwanted changes, while overly restrictive permissions can break services and user workflows. Special modes such as SUID require particular care because they can cause a program to run with the file owner’s privileges.
Service checks and troubleshooting
I used systemctl status sshd to confirm that the SSH daemon had started. After changing sshd_config, the daemon needed to be restarted before the new authentication settings applied. The permanent firewalld rules also needed a reload before SSH or DHCP traffic could pass through the host firewall.
The DHCP setup depended on the static interface and the values in dhcpd.conf agreeing with each other. A wrong subnet declaration or address range could stop the service from starting correctly. A wrong router option could leave clients confined to the local subnet, while a wrong DNS option could give them an address but prevent nekrotic.local domain discovery.
For a client that did not receive a usable lease, the configuration points to check were the server’s 192.168.1.4/24 interface, the 192.168.1.10 to 192.168.1.254 pool, the 192.168.1.1 gateway, the 192.168.1.2 DNS server, the dhcpd service state, and the DHCP firewall rule. That separated service failures from leases containing incorrect network settings.
Security notes
SSH is useful for administration, but it is also a high-value remote access service. I allowed it through the firewall deliberately, disabled direct root login, and moved from password authentication to key-based authentication.
DHCP is also a core availability service. If the range, gateway, DNS server, or lease settings are wrong, clients may receive an address but still fail to reach the right systems. In an Active Directory environment, handing out the wrong DNS server can stop domain discovery and authentication workflows from behaving correctly.
Users, groups, ownership, and mode bits decide what local accounts and services can read, modify, or execute. A single ownership or mode error can expose data, prevent a service from reading its configuration, or allow an account to change a file it should not control.
Currentness note
This is a historical CentOS lab from 2021. Current Linux and RHEL-compatible distributions may use different package names, firewall defaults, network tooling, SSH directives, service names, and support lifecycles. In particular, the recorded sshd_config block is not a drop-in modern hardening baseline; settings such as RSAAuthentication and UsePAM must be checked against the distribution and OpenSSH version in use.